About the Author

Mike Hillyer is a Technical Writer for MySQL AB and lives in Alberta, Canada.
Related Pages:
Securing a MySQL Server on Windows
By Mike Hillyer
last updated: February 1, 2005
Introduction
At the end of January 2005 a new worm-like malware named Forbot spread across the Internet, targeting poorly configured MySQL installations and exploiting them to gain access to the Windows host machines. Forbot was not a worm, in the sense that it had to be signalled to continue infecting other machines. Once the lines of communication between Forbot and its controllers were cut the spread of the bot was halted. Further information on forbot can be found in an article at http://dev.mysql.com/tech-resources/articles/security_alert.html.
It is important to understand that Forbot did not exploit any weaknesses or vulnerabilities in MySQL. There is no patch required to prevent future exploits. Forbot acted by exploiting poorly configured MySQL installations that had been installed with no root password or with a weak root password. Some examples of the passwords Forbot tried to use to access the MySQL root account include abcd1234 and 654321 (see http://www3.ca.com/securityadvisor/virusinfo/virus.aspx?id=41547 for the full list).
MySQL AB is taking an active role in developing new processes for ensuring that a default MySQL installation is as secure as possible, and is developing new technologies that will help customers stay up to date and be notified of updates and technical alerts, but there are several things you can do now to secure your MySQL servers.
The intent of this article is to list the steps that an administrator can take to properly secure a MySQL installation on Windows. While the procedures listed are written for Windows users, the principles contained herein will be of benefit to users of Linux and Unix as well. While Forbot was targeted at Windows machines, Linux and Unix users could be at risk from future variants of this method of attack.
Step 1: Install MySQL on a Recent, NT-based version of Windows
The recent, NT-based versions of Windows, including Windows 2000, Windows XP, and Windows Server 2003, are more secure and stable than previous versions of Windows such as Windows 95, Windows 98, and Windows ME.
Ensure that the host operating system is completely up to date with the latest service packs and patches.
Step 2: Install MySQL on an NTFS File System
NTFS is a much more secure file system than its predecessor FAT32. NTFS supports access controls, large files, and data encryption. For additional information on the benefits of using NTFS over FAT32, see http://www.ntfs.com/ntfs_vs_fat.htm.
Step 3: Install MySQL on a Standalone Machine
In production, MySQL should be installed on a server machine dedicated to hosting the MySQL server. All services that are not required should be disabled and no extra applications should be run. This not only increases the stability of the server, it frees more system resources for MySQL and prevents third-party applications from being potential security threats. There should be no user logins allowed other than administrators.
Step 4: Install the Latest Production Version of MySQL
At the time of writing, MySQL 4.1.9 is the latest production version of MySQL. A new Windows installer was introduced with MySQL 4.1.5 that simplifies the process of installing MySQL and it is recommended that all users upgrade to the latest 4.1 version of MySQL. While security bug fixes are usually ported to previous versions of MySQL, using the latest production version ensures that your MySQL installation is as stable and secure as possible. Using pre-production software such as MySQL 5.0 is not recommended for production servers as not all bugs have necessarily been identified and corrected, resulting in decreased stability and possibly decreased security.
Step 5: Secure the MySQL User Accounts
During the installation process, provide a root password when prompted. Ensure that your root password is a strong password, containing letters, numbers, and symbols. The password should be at least 6 characters long, should not contain any words found in a dictionary, and letters should be in mixed case.
One approach I use is to find a line or phrase that is easy for me to remember, then take the first letter from each word and the punctuation and combine them into a password. For example, take the phrase "To be, or not to be: that is the question!", this can be converted into the password "2b,On2b:Titq!". This password is quite strong (or was until I used it in this article) and is easy to remember. Try to use less commonly known phrases in case future worms use this technique to generate the list of passwords attempted when attacking the root account.
In addition, check the box marked "Root May Only Connect from Localhost" and leave the box marked "Create An Anonymous Account" unchecked. This will greatly increase the security of your MySQL installation.
For users securing an existing MySQL installation, it is possible to remove the anonymous account manually using the following commands:
Enter password: *****
Welcome to the MySQL monitor.  Commands end with ; or \g.
Your MySQL connection id is 1 to server version: 4.1.9-nt

Type 'help;' or '\h' for help. Type '\c' to clear the buffer.

mysql> use mysql;
Database changed
mysql> DELETE FROM user WHERE user = '';
Query OK, 2 rows affected (0.03 sec)

mysql> FLUSH PRIVILEGES;
Query OK, 0 rows affected (0.05 sec)

mysql>
In addition, the root account can be restricted to logins from localhost with the following commands:
Enter password: *****
Welcome to the MySQL monitor.  Commands end with ; or \g.
Your MySQL connection id is 1 to server version: 4.1.9-nt

Type 'help;' or '\h' for help. Type '\c' to clear the buffer.

mysql> use mysql;
Database changed
mysql> DELETE FROM user WHERE user = 'root' AND host = '%';
Query OK, 2 rows affected (0.03 sec)

mysql> FLUSH PRIVILEGES;
Query OK, 0 rows affected (0.05 sec)

mysql>
This will leave a single root user who can connect from localhost. Add the following entry to your hosts file (typically located at C:\WINDOWS\system32\drivers\etc\hosts):
127.0.0.1 localhost
This will prevent login errors where MySQL cannot resolve the localhost value in the user table.
Step 6: Disable TCP/IP Access
By default the MySQL server will allow connections via TCP/IP from any host (but may reject a connection based on the user's remote hostname/IP address). In many cases TCP/IP connectivity is not required and can be disabled to prevent remote access to the MySQL server. If you are using MySQL locally for development or for use with a web server, you should disable TCP/IP networking.
To disable TCP/IP networking, choose the Detailed Configuration option during installation, and uncheck the Enable TCP/IP Networking option (you can re-configure a server by starting the MySQL Configuration Wizard located at Start > Programs > MySQL > MySQL Server 4.1 > MySQL Server Instance Config Wizard).
Users of older versions of MySQL can add the following lines to the [mysqld] section of your MySQL server configuration file:
skip-networking

enable-named-pipes
This will disable TCP/IP connections and enable named pipes. For this to work you must install MySQL on an NT-based Windows operating system, and use the mysqld-nt.exe server binary. The location of your configuration file will vary depending on the version of MySQL you have installed, look for one of the following files:
- C:\my.cnf
- C:\Windows\my.ini
Step 6.1: Using Named Pipes
Once the server is started with named pipe support, you can connect with the following command:
C:\>mysql -h . -u root -p
This will connect to the server using named pipes. With recent (4.1 and higher) servers you can also use the --protocol=pipe option instead of specifying -h . on the command line:
C:\>mysql --protocol=pipe -u root -p
Individual client tools and APIs may use different syntax for connecting via named pipes, consult the documentation of the individual tool or API for information on connecting via named pipes.
Step 6.2: Using Shared Memory
In addition to named pipes, MySQL 4.1 supports the use of shared memory for connecting to MySQL. To enable shared memory, add the following line to the [mysqld] section of your MySQL server configuration file:
shared-memory
The MySQL Configuration Wizard does not have options to configure shared memory, so this option must be added to the configuration file manually. Users of the MySQL Configuration Wizard can find the my.ini file at C:\Program Files\MySQL\MySQL Server 4.1\my.ini.
To connect to a server via shared memory, use the following syntax:
C:\>mysql --protocol=memory -u root -p
Step 7: Bind the TCP/IP Address
In some situations is is not possible to disable TCP/IP networking even when the server will only be needed for requests from localhost. One example is when you use tools that do not support connections via named pipes or shared memory. In such situations you can add the following to the [mysqld] section of your server configuration file:
bind-address=127.0.0.1
This will cause the MySQL server to respond only to requests from localhost, and ignore all requests from the machine's network interfaces.
Step 8: Firewall the Server
All server machines should be protected by a firewall as the first line of defense against a malicious user. Under no circumstances should the MySQL server be accessible to the Internet. When a MySQL server is used by client machines across a LAN it may be necessary to permit external access to MySQL from other machines on the local network, but the LAN should be separated from the Internet by a firewall that blocks traffic on port 3306.
At the very least a software firewall should be installed on the MySQL server that only permits connections from the local network and other trusted IP addresses. Ideally you should place a hardware firewall between the MySQL server and the Internet.
This does not mean users cannot access MySQL remotely, it is possible to use SSH port forwarding to tunnel MySQL traffic through a firewall. See my article on SSH tunneling at http://www.vbmysql.com/articles/security/gui-tunnel.html for more information.
Step 9: Run The MySQL Service as a Limited User
By default, the MySQL server service runs as a privileged local system user. MySQL can be run as a limited user to restrict its capabilities and limit what a compromised MySQL server is capable of.
First create a windows user account named mysql with a strong password. Stop the service using the Services window in the Administrative Tools section of the Windows Control Panel. Right-click the MySQL entry in the list of services and choose the Stop option from the drop-down menu.
Minimize the services window and browse to the MySQL directory, typically located at C:\Program Files\MySQL\MySQL Server 4.1.
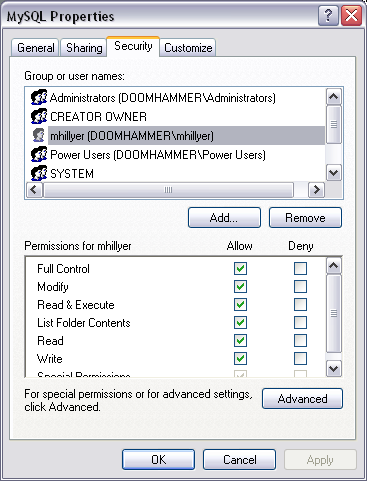
Change the permissions of this folder and its contents to permit access to the folder by the MySQL user and block it for all other users. Right-click on the folder and choose the Properties option from the drop-down menu. Select the Security tab (if it is not present, your Windows installation is using simple file sharing. Choose the Folder Options option from the Tools menu and switch to the View tab. Scroll to the bottom of the Advanced Settings window and uncheck the Use simple file sharing box.):

At first there are a number of permissions provided to existing users that are inherited from directories higher up the directory tree. These can be removed by clicking on the Advanced button and un-checking the Inherit from parent... box. When prompted, click the Remove button to remove the existing permissions.
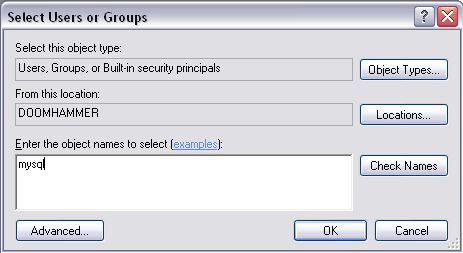
Click the Add... button under the user list to add the mysql user to the list of users with permissions to access the MySQL installation folder (which should now be blank since we removed all existing permissions):

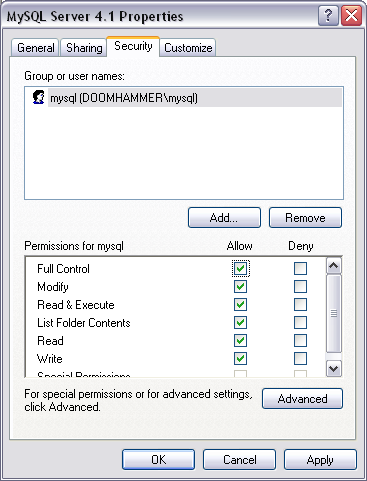
Enter the mysql username and click the Check Names button. The proper path and username should be filled in and you can click the OK button. Check the Full Control option in the permissions list to give full access to the folder:

Click Apply to grant permissions. In addition, grant the same permissions to your own user account so that you can later modify the configuration files and use tools such as myisamchk without switching users.
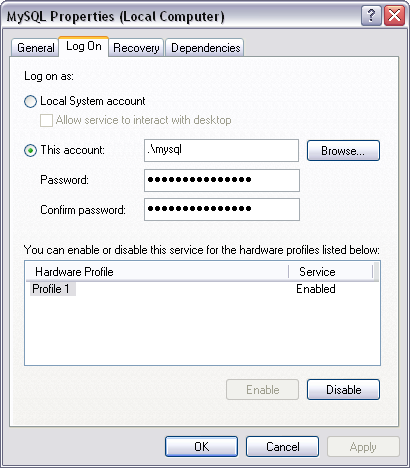
Once the directory permissions are set, return to the services list, right-click on the MySQL service entry, and select the Log On tab:

Choose the This Account radio button and fill in the information for the mysql user you created previously. Click OK to apply your settings, then right-click the MySQL service in the services list and choose the Start option. Your MySQL service will start, running as the limited mysql user.
Step 10: Encrypt the Data Folder
For users who store particularly sensitive information within MySQL, it is possible to encrypt the data directory of your MySQL installation. The encryption should be performed while the server is not running, and while you are logged-in as the mysql user. Users should be aware that if the private key used to encrypt the data directory is lost, all data is lost. Performance will be diminished because all files must be decrypted before they can be accessed. Considering the risks of data and performance loss, data directory encryption is not recommended unless it is considered absolutely necessary, and then should only be used by experienced users.
Information on data encryption, along with a list of best practices, can be found at http://support.microsoft.com/default.aspx?scid=kb;EN-US;q223316. It should also be noted that the files are encrypted for the mysql Windows user, and external applications such as myisamchk will not have access to the data files unless you login as the mysql user.
Step 11: GRANT the Minimum Privileges Necessary
When creating new users and granting privileges, it is often easy to grant all privileges on a database or all privileges globally, but this should be avoided. When granting privileges, try to grant the minimum necessary for a user to perform their assigned tasks. Grant the privileges on a database by database basis, and avoid using a hostname of %. If a user needs to connect within a 192.168.1.0 network, grant the privileges to 'username'@'192.168.1.%'. Try to be a restrictive as possible, and grant additional privileges only as they are needed.
For example, when creating a new user for the 'fictional' database that needs to query and manipulate data, use the following:
mysql> GRANT SELECT, INSERT, UPDATE, DELETE ON fictional.* TO 'bob'@'192.168.1.%';
Step 12: Change the Name of the Root User
The root user does not need to be named 'root'. Most attackers will obviously try to compromise the 'root' user account and will be stopped if there is no 'root' user. To change the name of the root user account, use the following commands:
Enter password: *****
Welcome to the MySQL monitor.  Commands end with ; or \g.
Your MySQL connection id is 1 to server version: 4.1.9-nt

Type 'help;' or '\h' for help. Type '\c' to clear the buffer.

mysql> USE mysql;
Database changed
mysql> UPDATE user SET user='bob' WHERE user='root';
Query OK, 1 row affected (0.19 sec)
Rows matched: 1  Changed: 1  Warnings: 0

mysql> FLUSH PRIVILEGES;
Query OK, 0 rows affected (0.23 sec)
You can of course use any name you wish, but I recommend not using your own name as an attacker might assume that an account with your name would have root-level privileges.
Conclusion
With a few simple steps MySQL on Windows can be secured to prevent malicious users from accessing MySQL and the data it contains. The key steps are to secure the default user accounts, limit external access, and use strong passwords. Those looking to increase the security of their server can run MySQL as a limited user, change the name of the root account, and even encrypt the MySQL data directory.
It is quite probable that there will be future variants of the Forbot malware, but with preparation and adherence to some simple security best practices, it is possible to prevent these attacks from ever reaching or compromising your MySQL server.

