About the Author

Michael G. Zinner is lead developer of the MySQL GUI team and lives in Vienna, Austria.
The all-new MySQL Server Windows Installer
This is the third of our on-going series of articles that explain some the new features in MySQL 4.1, which as of this writing is in the gamma phase of its development cycle, on the way to a production-ready release in the near future.
By Michael G. Zinner
A prominent new feature for Windows users is the new Windows installer that is included in 4.1.5 and later. The new installer makes use of the Windows Installer (MSI) and includes a new MySQL Server Instance Configuration Wizard that can be used to generate an optimized server configuration and to apply core security settings.
Background Info - MSI Setup and WiX
Microsoft has included an improved version of their Microsoft Windows Installer (MSI) in the recent versions of Windows. Using the MSI has become the de-facto standard for application installations on Windows 2000 and Windows XP. The new MySQL server installer now also makes use of this technology to provide a smoother and more flexible installation progress.
Further, Microsoft has introduced the WiX (Windows Installer XML) toolset recently. It is the first, highly acknowledged Open Source project from Microsoft. We switched to WiX for two reasons. First, it is an Open Source project and second, it allows us to handle the complete Windows engineering process in a flexible way with scripts.
The New "Essential" Package
For this reason we can now offer a new package as a complement to our
traditional packages. It is called the "essential" package (e.g.
mysql-4.1.7-essential-win.msi) since it features only the
essential components one needs to run the MySQL server on a Windows machine.
These include the optimized server binaries for Windows 9x/ME and Windows NT
based systems, the command line tools, and the C developer files without debug
information.
This "essential" package is now becoming the recommended package because it has a reduced file size and contains everything needed in a standard setup.
Let me summarize all packages for Windows here, I will take the 4.1.5 release for example:
mysql-4.1.7-win-noinstall.zip- This is a ZIP file that simply contains all binary files and can be extracted to
C:\or any other directory. This requires manual configuration. No changes have been made to this package. mysql-4.1.7-win.zip- This ZIP file contains the new installer as well as the Server Instance Configuration Wizard.
mysql-4.1.7-essential-win.msi- This is a MSI file that can be executed by double-click. It contains only optimized server binaries, the command line tools, and the C developer files without debug information.
New Features
When you look at the new features you will find that some of the default behaviour and default values have changed. We know that this means you have to learn something new and it might also require changes to your current system.
If you are having a problem with any of the new features, please note that
you can still do the MySQL Server installation the way you are used to. The
"noinstall" ZIP file has not been changed and you can ignore the new features
and only do a basic installation to C:\.
We have applied the changes to make the MySQL server conform to Microsoft guidelines and to make it behave more like what a Windows user expects from a typical Windows application.
New Default Install Location
When the default installation path is not changed the server is now
installed to C:\Program Files\MySQL\MySQL Server 4.1. This is the
new recommended location for the MySQL server.
The idea behind this is to have all MySQL products in the C:\Program
Files\MySQL directory. A typical MySQL setup on a developer machine will
look this way:
C:\Program Files\MySQL\MySQL Server 4.1 C:\Program Files\MySQL\MySQL Server 5.0 C:\Program Files\MySQL\MySQL Administrator 1.0 C:\Program Files\MySQL\MySQL Query Browser 1.0
New Start Menu Entries
After a standard installation has been completed you will find three new entries in the Start Menu under "Start > All Programs > MySQL > MySQL Server 4.1".
"MySQL Command Line Shell" calls the MySQL command line shell and tries to connect as root user. You will be prompted for the password that you can set in the "Security Options" dialog in the Configuration Wizard. Please not that this only works for servers running on port 3306.
"MySQL Server Instance Config Wizard" will launch the Wizard. Use this option when you did not select to configure the server directly after the installation or to re-configure the server.
"MySQL Documentation" opens the MySQL HTML documentation. Please note that this shortcut is not installed in the "essential" package since it does not contain these files. You should use the online documentation instead.
New Registry Key Entries
The MySQL server setup always has created a key in the Windows registry
under HKEY_LOCAL_MACHINE\SOFTWARE\MySQL AB. It was called
MySQL Servers and Clients 4.1.3b-beta for example.
The new installer now creates a key called MySQL Server 4.1. It
now contains two string values, Location and Version. The Location string
contains the installation directory. In case of an default installation on a
German Windows machine it will contain C:\Programme\MySQL\MySQL Server
4.1\. The Version string contains the release number, 4.1.5
for the MySQL Server 4.1.5.
Please note that these registry keys are just used for additional
information. They are not required to run the server and when using the
noinstall ZIP they will not be created. These are used by the
Server Instance Configuration Wizard and 3rd party applications can check for
these values before doing a complete scan of the hard disk.
New Upgrade Feature
Starting with the installer included in 4.1.5 it is possible to use the upgrade feature of MSI. That means you do not have to de-install the MySQL old server before installing a new release.
It is important to note that this only works for servers that have the same major and minor version number, e.g. 4.1.5 can be upgraded to 4.1.6 because they are both 4.1 releases. The 5.0 server will be installed in its own directory.
Please Note:
- When you are upgrading from 4.1.4 or earlier releases you should do an uninstall before installing the new 4.1.5 release, since old releases cannot be upgraded.
- The server will be stopped before the upgrade. All users will be disconnected. Do not forget to restart the server after the upgrade was finished.
The MySQL Server Instance Configuration Wizard
Configuring MySQL has always been a challenging task. Although the manual provided detailed information on how to configure the server and the packages include several template configuration files, it required a lot of time to find the optimal configuration for each individual machine.
Therefore we have been working on a Configuration Wizard that can be used to generate an optimal configuration based on a couple of questions that can easily answered.
When you are using the new installer you will notice a checkbox that is shown on the "Setup Complete Successfully" page. This checkbox is labelled "Configure the MySQL Server now" and is checked by default.
When the checkbox is checked the new MySQL Server Instance Configuration Wizard will be launched after the installation has been completed successfully and you press the [Finish] button.
How to Use the Configuration Wizard
After you have clicked next on the welcome page you can choose which type of configuration you want to do. The "Standard Configuration" should only be used on machines that do not have a MySQL server installed at the moment since it will configure the server to use TCP port 3306 which might conflict with existing servers.
I will quickly go over the individual pages but as you can see, the options and description texts are quite self-explanatory.
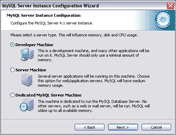
After selecting "Detailed Configuration" and pressing [Next >] you have to specify which kind of machine this is. This will influence memory, disk and CPU usage. Using "Developer Machine" will assign 12% of the available memory to MySQL which is quite sufficient for development. Selecting "Server Machine" will use 50% which results in a much better performance. Finally, if this is a dedicated MySQL server machine and no other server application will run, you should select "Dedicated MySQL Server Machine". This assigns up to 95% of available memory to the server.
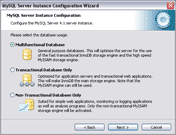
On the "Database Usage" dialog you can select which MySQL storage engine you use the most. People who are new to the MySQL server should use "Multifunctional Database". This will make the transactional InnoDB storage engine the default one and divide the memory between MyISAM and InnoDB. Advanced users can select to only use InnoDB or MyISAM storage engines. Note that even when you select "Transactional Database Only" you can still use MyISAM tables for logging or temporary tables.
If you select "Multifunctional Database" or "Transactional Database Only" you can specify the location for the InnoDB table space on the next dialog. If you have specific hard disk you want to use for data storage you can select the drive and path here. Note that using a Fat32 formatted partition can result in better server performance but that this is not as secure as using a standard NTFS partition. People who are new to MySQL should keep the default "Installation Path".
On the next dialog you can specify how many concurrent connections to the server you expect. Please note that this does not limit the connections, it only assigns an optimal amount of memory to each connection.
In the networking options dialog you should keep the "Enable TCP/IP Networking" turned on to allow connections other than named pipes, which is a NT based Windows only feature. The port number is important. It specifies the port on which the server should listen for client connections. The default port is 3306. If you already have a MySQL server running on this port you have to change the port number. When pressing [Next >] the Wizard checks if the port is already in use and warns you if it is already taken.
If you have to deal with a lot of different languages you should use the "Best Support For Multilingualism" option in the default character set dialog. This will set the default character to UTF8 which allows the storage of multilingual texts in the database.
The Windows Service dialog is only available on Windows NT bases systems like Windows NT 4.0/2000/XP/2003. To run the MySQL server as a Windows service is the recommended way to run the server on Windows. Please note that the service name, just like the port number, has to be unique. If you already have a service installed with the name "MySQL" you have to choose a different name for the new service. Note that service names are not case sensitive.
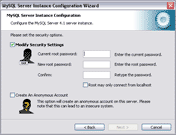
The last option dialog is dedicated to security settings. On this dialog you should set a password for the root account, which has full access to the MySQL server. After new installation password of the root account is empty, allowing everyone to access the MySQL server. Another feature that is available after a new installation is an anonymous account that allows guests to connect to the server. This feature should be turned off for normal MySQL installations.
After all options have been set, you can press [Execute] on the execution plan dialog. This will setup the new server instance.
The following steps will be applied:
- Prepare Configuration
- All options and required files will be checked.
- Write Configuration File
- The MySQL configuration file (
.cnffile) will be generated and stored in the installation directory (e.g.C:\Program Files\MySQL\my.cnf). Please note that Windows hides the file extension.cnf. - Start Service
- The Wizard installs the Windows service and tries to start up the MySQL server for the first time. If the server startup fails, you can find error logs in the data directory (
C:\Program Files\MySQL\data\*.err). You can modify the configuration file according to the error message. But please note that this should not occur. - Apply Security Settings
- The security settings will be applied if you selected the appropriate options. A TCP/IP connection to the server will be established and the
usertable in themysqlschema will be updated. If this step can be completed successfully the server has been configured well.
Advanced Features of the Configuration Wizard
You can run the Configuration Wizard again at any time to change the current configuration. Use the Start Menu entry "Start > All Programs > MySQL > MySQL Server 4.1 > MySQL Server Instance Config Wizard" to launch the Wizard.
When the Wizard is launched and it finds an existing instance, you can choose to modify the existing configuration or to remove the instance.
If you select to modify the configuration you have to answer all questions again and set the options as needed.
Please note that you cannot change the Windows service settings. To change the settings you have to use MySQL Administrator or remove the instance with Wizard and configure it again.
De-Installation
When de-installing the server, and you have configured a server instance with the Configuration Wizard before, this instance will be removed. The Windows service will be removed and the configuration file will be deleted automatically.
Please note, that if you want to upgrade to a new release you do not have to de-install the server anymore. The server will be stopped automatically when you apply the upgrade. Please note that this will disconnect all connected users.
Summary
The new MySQL Server Windows Installer offers a more flexible way of installing the MySQL server. It offers a convenient way to generate an optimal configuration for your MySQL server and makes tasks like upgrading and removal easy.


