


piecepackr is an R package designed to make configurable board game graphics. It can be used with the grid, rayrender, and rgl graphics packages to make board game diagrams, board game animations, and custom Print & Play layouts. By default it is configured to make piecepack game diagrams, animations, and "Print & Play" layouts but can be configured to make graphics for other board game systems as well.
grid.piece is the core function that can used to draw board game components (by default piecepack game components) using grid:
library("piecepackr")
g.p <- function(...) { grid.piece(..., default.units="in") }
g.p("tile_back", x=0.5+c(3,1,3,1), y=0.5+c(3,3,1,1))
g.p("tile_back", x=0.5+3, y=0.5+1)
g.p("tile_back", x=0.5+3, y=0.5+1)
g.p("die_face", suit=3, rank=5, x=1, y=1)
g.p("pawn_face", x=1, y=4, angle=90)
g.p("coin_back", x=3, y=4, angle=180)
g.p("coin_back", suit=4, x=3, y=4, angle=180)
g.p("coin_back", suit=2, x=3, y=1, angle=90)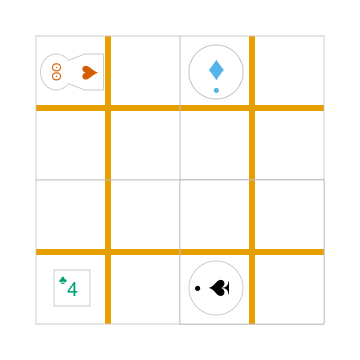
One can use lists to configure the appearance of the game components drawn by grid.piece:
dark_colorscheme <- list(suit_color="darkred,black,darkgreen,darkblue,black",
                     invert_colors.suited=TRUE, border_color="black", border_lex=2)
piecepack_suits <- list(suit_text="\U0001f31e,\U0001f31c,\U0001f451,\u269c,\uaa5c", # 🌞,🌜,👑,⚜,꩜
                    suit_fontfamily="Noto Emoji,Noto Sans Symbols2,Noto Emoji,Noto Sans Symbols,Noto Sans Cham",
                    suit_cex="0.6,0.7,0.75,0.9,0.9")
traditional_ranks <- list(use_suit_as_ace=TRUE, rank_text=",a,2,3,4,5")
cfg <- c(piecepack_suits, dark_colorscheme, traditional_ranks)
g.p <- function(...) { grid.piece(..., default.units="in", cfg=pp_cfg(cfg)) }
g.p("tile_back", x=0.5+c(3,1,3,1), y=0.5+c(3,3,1,1))
g.p("tile_back", x=0.5+3, y=0.5+1)
g.p("tile_back", x=0.5+3, y=0.5+1)
g.p("die_face", suit=3, rank=5, x=1, y=1)
g.p("pawn_face", x=1, y=4, angle=90)
g.p("coin_back", x=3, y=4, angle=180)
g.p("coin_back", suit=4, x=3, y=4, angle=180)
g.p("coin_back", suit=2, x=3, y=1, angle=90)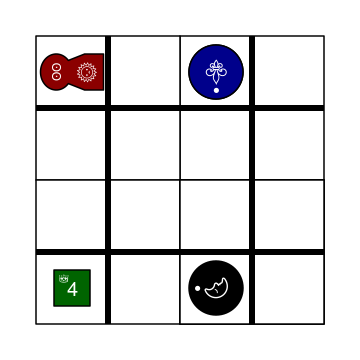
grid.piece even has some support for drawing 3D diagrams with an oblique projection:
cfg3d <- list(width.pawn=0.75, height.pawn=0.75, depth.pawn=1,
                   dm_text.pawn="", shape.pawn="convex6", invert_colors.pawn=TRUE,
                   edge_color.coin="tan", edge_color.tile="tan")
cfg <- pp_cfg(c(cfg, cfg3d))
g.p <- function(...) {
    grid.piece(..., op_scale=0.5, op_angle=45, cfg=cfg, default.units="in")
}
g.p("tile_back", x=0.5+c(3,1,3,1), y=0.5+c(3,3,1,1))
g.p("tile_back", x=0.5+3, y=0.5+1, z=1/4+1/8)
g.p("tile_back", x=0.5+3, y=0.5+1, z=2/4+1/8)
g.p("die_face", suit=3, rank=5, x=1, y=1, z=1/4+1/4)
g.p("pawn_face", x=1, y=4, z=1/4+1/2, angle=90)
g.p("coin_back", x=3, y=4, z=1/4+1/16, angle=180)
g.p("coin_back", suit=4, x=3, y=4, z=1/4+1/8+1/16, angle=180)
g.p("coin_back", suit=2, x=3, y=1, z=3/4+1/8, angle=90)
save_print_and_play makes a "Print & Play" pdf of a configured piecepack, save_piece_images makes individual images of each piecepack component:
If you are comfortable using R data frames there is also pmap_piece that processes data frame input. It accepts an optional trans argument for a function to pre-process the data frames, in particular if desiring to draw a 3D oblique projection one can use the function op_transform to guess both the pieces' z-coordinates and an appropriate re-ordering of the data frame given the desired angle of the oblique projection.
library("dplyr", warn.conflicts=FALSE)
library("tibble")
df_tiles <- tibble(piece_side="tile_back", x=0.5+c(3,1,3,1,1,1), y=0.5+c(3,3,1,1,1,1))
df_coins <- tibble(piece_side="coin_back", x=rep(1:4, 4), y=rep(c(4,1), each=8),
                       suit=1:16%%2+rep(c(1,3), each=8),
                       angle=rep(c(180,0), each=8))
df <- bind_rows(df_tiles, df_coins)
cfg <- game_systems("dejavu")$piecepack
pmap_piece(df, cfg=cfg, default.units="in", trans=op_transform, op_scale=0.5, op_angle=135)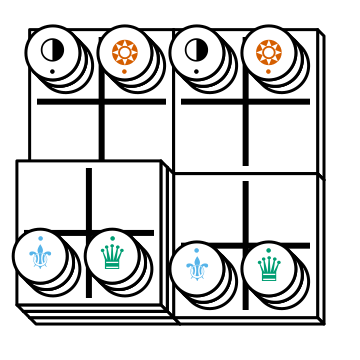
piece3d draws pieces using rgl graphics.
library("ppgames")
library("rgl")
invisible(rgl::open3d())
rgl::view3d(phi=-30, zoom = 0.8)

df <- ppgames::df_four_field_kono()
envir <- game_systems("dejavu3d")
pmap_piece(df, piece3d, trans=op_transform, envir = envir, scale = 0.98, res = 150)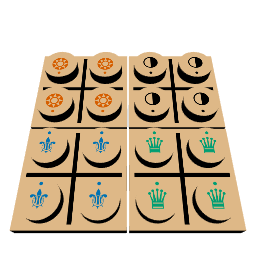
piece creates rayrender objects.
library("ppgames")
library("rayrender")
df <- ppgames::df_four_field_kono()
envir <- game_systems("dejavu3d")
l <- pmap_piece(df, piece, trans=op_transform, envir = envir, scale = 0.98, res = 150)
scene <- Reduce(rayrender::add_object, l)
rayrender::render_scene(scene, lookat = c(2.5, 2.5, 0), lookfrom = c(0, -2, 13))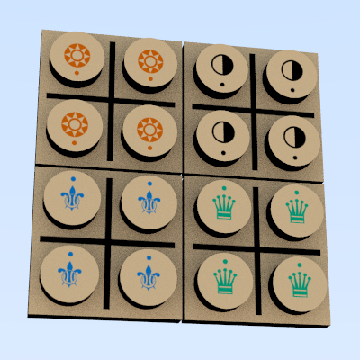
A slightly longer intro to piecepackr's API plus several piecepackr demos and other piecpackr docs are available at piecepackr's companion website as well as some pre-configured Print & Play PDFs. More API documentation is also available in the package's built-in man pages.
The function game_systems returns configurations for multiple public domain game systems.
game_systems returns a checkers1 and checkers2 configuration which has checkered and lined "boards" with matching checker "bits" in various sizes and colors.
df_board <- tibble(piece_side = "board_face", suit = 3, rank = 8,
               x = 4.5, y = 4.5)
df_w <- tibble(piece_side = "bit_face", suit = 6, rank = 1,
               x = rep(1:8, 2), y = rep(1:2, each=8))
df_b <- tibble(piece_side = "bit_face", suit = 1, rank = 1,
               x = rep(1:8, 2), y = rep(7:8, each=8))
df <- rbind(df_board, df_w, df_b)
df$cfg <- "checkers1"
pmap_piece(df, envir=game_systems(), default.units="in", trans=op_transform, op_scale=0.5)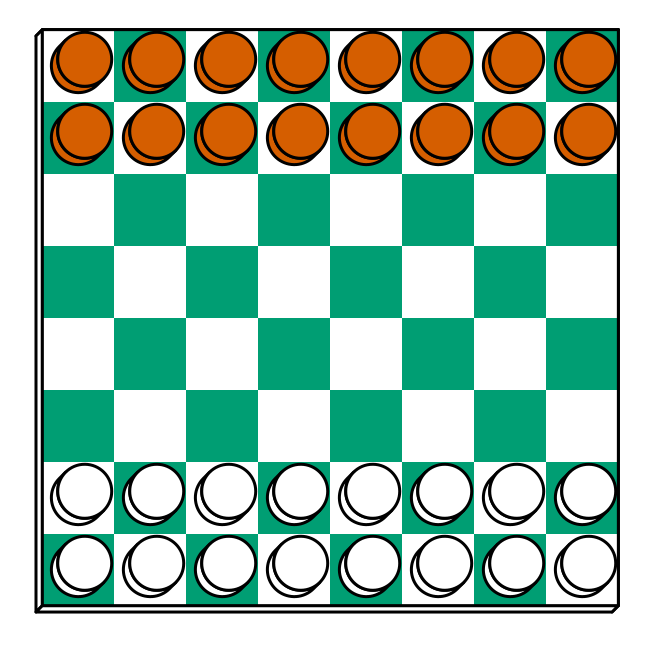
game_systems returns a dice configuration which can make standard 6-sided dice in six colors.
game_systems returns seven different configurations for double-12 dominoes:
dominoesdominoes_blackdominoes_bluedominoes_greendominoes_reddominoes_white (identical to dominoes)dominoes_yellowlibrary("tibble")
envir <- game_systems("dejavu")
df_dominoes <- tibble(piece_side = "tile_face", x=rep(4:1, 3), y=rep(2*3:1, each=4), suit=1:12, rank=1:12+1,
cfg = paste0("dominoes_", rep(c("black", "red", "green", "blue", "yellow", "white"), 2)))
df_tiles <- tibble(piece_side = "tile_back", x=5.5, y=c(2,4,6), suit=1:3, rank=1:3, cfg="piecepack")
df_dice <- tibble(piece_side = "die_face", x=6, y=0.5+1:6, suit=1:6, rank=1:6, cfg="dice")
df_coins1 <- tibble(piece_side = "coin_back", x=5, y=0.5+1:4, suit=1:4, rank=1:4, cfg="piecepack")
df_coins2 <- tibble(piece_side = "coin_face", x=5, y=0.5+5:6, suit=1:2, rank=1:2, cfg="piecepack")
df <- rbind(df_dominoes, df_tiles, df_dice, df_coins1, df_coins2)
pmap_piece(df, default.units="in", envir=envir, op_scale=0.5, trans=op_transform)
game_systems returns three different piecepack configurations:
piecepackplaying_cards_expansiondual_piecepacks_expansionPlus a configuration for a subpack aka "mini" piecepack and a hexpack configuration.
The piecepack configurations also contain common piecepack accessories like piecepack pyramids, piecepack matchsticks, and piecepack saucers.
Configurations for the proprietary Looney Pyramids aka Icehouse Pieces game system by Andrew Looney can be found in the companion R package piecenikr: https://github.com/piecepackr/piecenikr
Here we'll show an example of configuring piecepackr to draw diagrams for the abstract board game Tak (designed by James Ernest and Patrick Rothfuss).
Since one often plays Tak on differently sized boards one common Tak board design is to have boards made with colored cells arranged in rings from the center plus extra symbols in rings placed at the points so it is easy to see smaller sub-boards. To start we'll write a function to draw the Tak board.
library("grid")
library("piecepackr")
grobTakBoard <- function(...) {
    g <- "darkgreen"
    w <- "grey"
    fill <- c(rep(g, 5),
              rep(c(g, rep(w, 3), g),3),
              rep(g, 5))
    inner <- rectGrob(x = rep(1:5, 5), y = rep(5:1, each=5),
                 width=1, height=1, default.units="in",
                 gp=gpar(col="gold", fill=fill, lwd=3))
    outer <- rectGrob(gp=gpar(col="black", fill="grey", gp=gpar(lex=2)))
    circles <- circleGrob(x=0.5+rep(1:4, 4), y=0.5+rep(4:1, each=4), r=0.1,
                         gp=gpar(col=NA, fill="gold"), default.units="in")
    rects <- rectGrob(x=0.5+c(0:5, rep(c(0,5), 4), 0:5),
                      y=0.5+c(rep(5,6), rep(c(4:1), each=2), rep(0, 6)),
                      width=0.2, height=0.2,
                      gp=gpar(col=NA, fill="orange"), default.units="in")
    grobTree(outer, inner, circles, rects)
}
Then we'll configure a Tak set and write some helper functions to draw Tak pieces with it.
cfg <- pp_cfg(list(suit_text=",,,", suit_color="white,tan4,", invert_colors=TRUE,
            ps_text="", dm_text="",
            width.board=6, height.board=6, depth.board=1/4,
            grob_fn.board=grobTakBoard,
            width.r1.bit=0.6, height.r1.bit=0.6, depth.r1.bit=1/4, shape.r1.bit="rect",
            width.r2.bit=0.6, height.r2.bit=1/4, depth.r2.bit=0.6, shape.r2.bit="rect",
            width.pawn=0.5, height.pawn=0.5, depth.pawn=0.8, shape.pawn="circle",
            edge_color="white,tan4", border_lex=2,
            edge_color.board="tan", border_color.board="black"))
g.p <- function(...) {
    grid.piece(..., op_scale=0.7, op_angle=45, cfg=cfg, default.units="in")
}
draw_tak_board <- function(x, y) {
    g.p("board_back", x=x+0.5, y=y+0.5)
}
draw_flat_stone <- function(x, y, suit=1) {
    z <- 1/4*seq(along=suit)+1/8
    g.p("bit_back", x=x+0.5, y=y+0.5, z=z, suit=suit, rank=1)
}
draw_standing_stone <- function(x, y, suit=1, n_beneath=0, angle=0) {
    z <- (n_beneath+1)*1/4+0.3
    g.p("bit_back", x=x+0.5, y=y+0.5, z=z, suit=suit, rank=2, angle=angle)
}
draw_capstone <- function(x, y, suit=1, n_beneath=0) {
    z <- (n_beneath+1)*1/4+0.4
    g.p("pawn_back", x=x+0.5, y=y+0.5, z=z, suit=suit)
}
Then we'll draw an example Tak game diagram:
pushViewport(viewport(width=inch(6), height=inch(6)))
draw_tak_board(3, 3)
draw_flat_stone(1, 1, 1)
draw_flat_stone(1, 2, 2)
draw_flat_stone(2, 4, 1)
draw_capstone(2, 4, 2, n_beneath=1)
draw_flat_stone(2, 5, 2)
draw_flat_stone(3, 4, 1:2)
draw_flat_stone(3, 3, c(2,1,1,2))
draw_flat_stone(3, 2, 1:2)
draw_flat_stone(3, 1, 2)
draw_standing_stone(4, 2, 2, angle=90)
draw_flat_stone(5, 2, 1)
draw_capstone(5, 3, 1)
popViewport()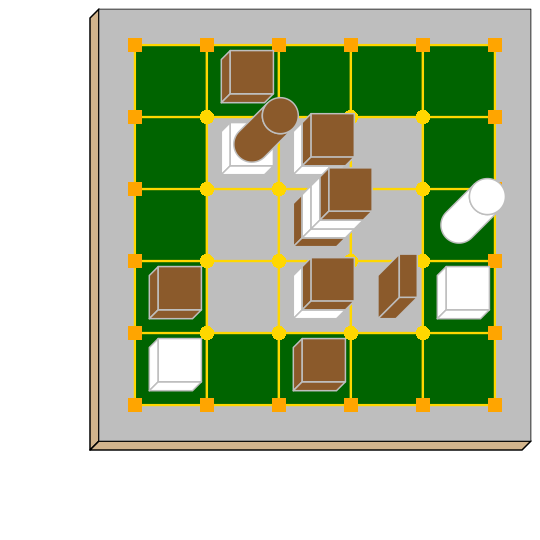
To install the last version released on CRAN use the following command in R:
To install the development version use the following commands:
The default piecepackr configuration should work out on the box on most modern OSes including Windows without the user needing to mess with their system fonts. However if you wish to use advanced piecepackr configurations you'll need to install additional Unicode fonts and Windows users are highly recommended to use and install piecepackr on "Ubuntu on Bash on Windows" if planning on using Unicode symbols from multiple fonts. The following bash commands will give you a good selection of fonts (Noto, Quivira, and Dejavu) on Ubuntu:
sudo apt install fonts-dejavu fonts-noto
fonts_dir=${XDG_DATA_HOME:="$HOME/.local/share"}/fonts
curl -O http://www.quivira-font.com/files/Quivira.otf
mv Quivira.otf $fonts_dir/
curl -O https://noto-website-2.storage.googleapis.com/pkgs/NotoEmoji-unhinted.zip
unzip NotoEmoji-unhinted.zip NotoEmoji-Regular.ttf
mv NotoEmoji-Regular.ttf $fonts_dir/
rm NotoEmoji-unhinted.zip
Note piecpackr works best if the version of R installed was compiled with support for Cairo and fortunately this is typically the case. One can confirm if this is true via R's capabilities function:
Also although most users won't need them piecpackr contains utility functions that depend on the system dependencies ghostscript and poppler-utils:
save_print_and_play will embed additional metadata into the pdf if ghostscript is available.get_embedded_font (a debugging helper function) needs pdffonts (usually found in poppler-utils)You can install these utilities on Ubuntu with
This software package is released under a Creative Commons Attribution-ShareAlike 4.0 International license (CC BY-SA 4.0). This license is compatible with version 3 of the GNU Public License (GPL-3).
The Print-and-Play pdf's produced by the save_print_and_play function can be configured in two different ways:
Print single-sided on label paper, cut out the labels, and apply to components (in the material of your choice) or print single-sided on paper(board), apply adhesive to the back, fold over in half "hot-dog-style", and cut out the components. One will need to to some additional folding and application of adhesive/tape in order to construct the dice, pawns, and pyramids. One can build more dice/pawns/pawn belts if you cut them out before folding the paper(board) in half but if you don't do so you should still have all the "standard" piecepack components.
Print double-sided on paper(board) and cut out the components. One will need to do some additional folding and application of adhesive/tape in order to construct the dice, pawns, and pyramids.
The Piecepack Wiki has a page on making piecepacks. The BoardGameGeek Print-and-Play Wiki also has lots of good info like how to quickly make coins uisng an arch punch.
Warning: Generally it is advisable to uncheck 'fit to size' when printing PDF files otherwise your components maybe re-sized by the printer.
Although one can use the API to make layouts with components of different sizes the default print-and-play pdf's draw components of the following size which (except for the pawns and non-standard "pawn belts") matches the traditional Mesomorph piecepack dimensions if one uses the default component shapes and sizes:
Components are drawn into rectangular drawing spaces (which are always squares except for pawn components). The program allows one to customize piecepack component shapes. If a components shape is rect it will fill up the entire rectangular drawing space, if it is a circle then the rectangular drawing space will be circumscribed around the circle. If a components shape is a convex# or concave# where # is the number of exterior vertices then the rectangular drawing space will be circumscribed around a circle that will be circumscribed around that convex/concave polygon. The rectangular drawing space also is circumscribed around the special halma, kite, and pyramid shapes.
Warning: Generally it is advisable to uncheck 'fit to size' when printing PDF files otherwise your components maybe re-sized by the printer.
You can specify colors either by RGB hex color codes or R color strings. "transparent" is a color option which does what you'd expect it to (if used for something other than the background color will render the element effectively invisible). Warning: you shouldn't mix "transparent" backgrounds with the invert_colors options.
There are a couple of approaches one can take:
fontconfig you might want to put the symbols in a part of the "Private Use Area" of Unicode not used by any other fonts on your system. If you do that you won't need to specify your font otherwise you'll need to configure the suit_symbols_font, rank_symbols_font, and/or dm_font options.grid's rasterGrob or grImport2's pictureGrob.The program uses Cairo which uses fontconfig to select fonts. fontconfig picks what it thinks is the 'best' font and sometimes it annoyingly decides that the font to use for a particular symbol is not the one you asked it to use. (although sometimes the symbol it chooses instead still looks nice in which case maybe you shouldn't sweat it). It is hard but not impossible to configure which fonts are dispatched by fontconfig. A perhaps easier way to guarantee your symbols will be dispatched would be to either make a new font and re-assign the symbols to code points in the Unicode "Private Use Area" that aren't used by any other font on your system or to simply temporarily move (or permanently delete) from your system font folders the undesired fonts that fontconfig chooses over your requested fonts:
# temporarily force fontconfig to use Noto Emoji instead of Noto Color Emoji in my piecepacks on Ubuntu 18.04
$ sudo mv /usr/share/fonts/truetype/noto/NotoColorEmoji.ttf ~/
## Make some piecepacks
$ sudo mv ~/NotoColorEmoji.ttf /usr/share/fonts/truetype/noto/
Also as a sanity check use the command-line tool fc-match (or the R function systemfonts::match_font) to make sure you specified your font correctly in the first place (i.e. fc-match "Noto Sans" on my system returns "Noto Sans" but fc-match "Sans Noto" returns "DejaVu Sans" and not "Noto Sans" as one may have expected). To help determine which fonts are actually being embedded you can use the get_embedded_font helper function:
fonts <- c('Noto Sans Symbols2', 'Noto Emoji', 'sans')
chars <- c('♥', '♠', '♣', '♦', '🌞' ,'🌜' ,'꩜')
get_embedded_font(fonts, chars)
#     char      requested_font            embedded_font
# 1      ♥ Noto Sans Symbols2 NotoSansSymbols2-Regular
# 2      ♠ Noto Sans Symbols2 NotoSansSymbols2-Regular
# 3      ♣ Noto Sans Symbols2 NotoSansSymbols2-Regular
# 4      ♦ Noto Sans Symbols2 NotoSansSymbols2-Regular
# 5       🌞Noto Sans Symbols2                NotoEmoji
# 6       🌜Noto Sans Symbols2                NotoEmoji
# 7      ꩜ Noto Sans Symbols2     NotoSansCham-Regular
# 8      ♥         Noto Emoji                NotoEmoji
# 9      ♠         Noto Emoji                NotoEmoji
# 10     ♣         Noto Emoji                NotoEmoji
# 11     ♦         Noto Emoji                NotoEmoji
# 12      🌞        Noto Emoji                NotoEmoji
# 13      🌜        Noto Emoji                NotoEmoji
# 14     ꩜         Noto Emoji     NotoSansCham-Regular
# 15     ♥               sans                    Arimo
# 16     ♠               sans                    Arimo
# 17     ♣               sans                    Arimo
# 18     ♦               sans                    Arimo
# 19      🌞              sans                NotoEmoji
# 20      🌜              sans                NotoEmoji
# 21 ꩜ sans NotoSansCham-RegularThere are two main ways that this package could be used to help make piecepack rulesets:
save_piece_images function makes individual images of components. By default it makes them in the svg formats with rotations of 0 degrees but with configuration can also make them in the bmp, jpeg, pdf, png, ps, and tiff formats as well as 90, 180, and 270 degree rotations. These can be directly inserted into your ruleset or even used to build diagrams with the aid of a graphics editor program. An example filename is tile_face_s1_r5_t180.pdf where tile is the component, face is the side, s1 indicates it was the first suit, r5 indicates it was the 5th rank, t180 indicates it was rotated 180 degrees, and pdf indicates it is a pdf image.grid graphics library in R to make diagrams. The important function for diagram drawing exported by the piecepack R package is grid.piece (or alternatives like pmap_piece) which draws piecepack components to the graphics device. The ppgames R package has code for several game diagram examples. One can also use this package to make animations.