
![]()
otpr is an R package that provides a simple wrapper for the OpenTripPlanner (OTP) API. To use otpr you will need a running instance of OTP. The purpose of the package is to submit a query to the relevant OTP API resource, parse the OTP response and return useful R objects.
This package will be useful to researchers and transport planners who want to use OTP to generate trip data for accessibility analysis or to derive variables for use in transportation models.
otpr supports OTP versions 1 and 2. However, as OTPv2 has not yet been released and changes to its codebase could cause errors in otpr or unexpected behaviour, OTPv2 support is currently considered experimental. Known issues with OTPv2 include:
otp_get_isochrone() is only supported in OTPv1 as this feature has been removed from OTPv2.otp_get_times() function is treated as a hard limit when the mode is either WALK or BICYCLE. This could result in no itinerary being returned as the default is 800m. This is different from the behaviour of OTPv1 where this parameter is effectively ignored when the mode is WALK and not applied at all to BICYCLE trips. Workaround: provide a large value to this parameter for these modes.To get a bug fix, or use a feature from the development version, you can install otpr from GitHub. See NEWS for changes since last release.
The first step is to call otp_connect(), which defines the parameters needed to connect to a router on a running OTP instance. The function can also confirm that the router is reachable.
# For a basic instance of OTP running on localhost with standard ports and a 'default' router
# this is all that's needed
otpcon <- otp_connect()
#> http://localhost:8080/otp is running OTPv1
#> Router http://localhost:8080/otp/routers/default existsIf the time zone of an OTP graph differs from the time zone of the local system running otpr then by default returned trip start and end times will be expressed in the local system’s time zone and not the time zone of the graph. This is because the OTP API returns EPOCH values and the conversion to date and time format occurs on the local system. A ‘timeZone’ column is included in returned dataframes that contain start and end times to make this explicit. If you wish to have start and end times expressed in the time zone of the graph, the ‘tz’ argument can be specified when calling the otp_connect() function. This must be a valid time zone (checked against the vector returned by OlsonNames()); for example: “Europe/Berlin”.
The functions that query the OTP API generally return a list of two elements. The first element is an errorId - with the value “OK” or the error code returned by OTP. If errorId is “OK”, the second element will contain the query response; otherwise it will contain the OTP error message.
To get the trip distance in metres between an origin and destination on the street and/or path network use otp_get_distance(). You can specify the required mode: CAR (default), BICYCLE or WALK are valid.
# Distance between Manchester city centre and Manchester airport by CAR
otp_get_distance(
  otpcon,
  fromPlace = c(53.48805,-2.24258),
  toPlace = c(53.36484,-2.27108)
)
#> $errorId
#> [1] "OK"
#>
#> $distance
#> [1] 29051.51

# Now for BICYCLE
otp_get_distance(
  otpcon,
  fromPlace = c(53.48805,-2.24258),
  toPlace = c(53.36484,-2.27108),
  mode = "BICYCLE"
)
#> $errorId
#> [1] "OK"
#>
#> $distance
#> [1] 16065.04To get the trip duration in minutes between an origin and destination use otp_get_times(). You can specify the required mode: TRANSIT (all available transit modes), BUS, RAIL, CAR, BICYCLE, and WALK are valid. All the public transit modes automatically allow WALK. There is also the option to combine TRANSIT with BICYCLE.
# Time between Manchester city centre and Manchester airport by BICYCLE
otp_get_times(
  otpcon,
  fromPlace = c(53.48805,-2.24258),
  toPlace = c(53.36484,-2.27108),
  mode = "BICYCLE"
)
#> $errorId
#> [1] "OK"
#>
#> $duration
#> [1] 60.12


# By default the date and time of travel is taken as the current system date and
# time. This can be changed using the 'date' and 'time' arguments
otp_get_times(
  otpcon,
  fromPlace = c(53.48805,-2.24258),
  toPlace = c(53.36484,-2.27108),
  mode = "TRANSIT",
  date = "04-29-2020",
  time = "07:15:00"
)
#> $errorId
#> [1] "OK"
#>
#> $duration
#> [1] 42.2To get more information about the trip when using transit modes, otp_get_times() can be called with the ‘detail’ argument set to TRUE. The trip duration (minutes) is then further broken down by time on transit, walking time (from/to and between stops), waiting time (when changing transit vehicle or mode), and number of transfers (when changing transit vehicle or mode).
# Time between Manchester city centre and Manchester airport by TRANSIT with detail
otp_get_times(
  otpcon,
  fromPlace = c(53.48805,-2.24258),
  toPlace = c(53.36484,-2.27108),
  mode = "TRANSIT",
  date = "04-29-2020",
  time = "07:15:00",
  detail = TRUE
)
#> $errorId
#> [1] "OK"
#>
#> $itineraries
#>                 start                 end      timeZone duration walkTime
#> 1 2020-04-29 07:37:31 2020-04-29 08:19:43 Europe/London     42.2     5.17
#>   transitTime waitingTime transfers
#> 1 37 0.03 0To get information about each leg of transit-based trips, otp_get_times() can be called with both the ‘detail’ and ‘includeLegs’ arguments set to TRUE. A third element, called ‘legs’, will then be returned. The ‘legs’ element is a dataframe containing a row for each leg of the trip. The information provided for each leg includes start and end times, duration, distance, mode, route details, agency details, and stop names. There is also a column called ‘departureWait’ which is the length of time in minutes required to wait before the start of a leg. The sum of ‘departureWait’ will equal the total waiting time for the itinerary.
# Time between Manchester city centre and Manchester airport by TRANSIT with detail and legs
trip <- otp_get_times(
  otpcon,
  fromPlace = c(53.48805,-2.24258),
  toPlace = c(53.36484,-2.27108),
  mode = "TRANSIT",
  date = "04-29-2020",
  time = "07:15:00",
  detail = TRUE,
  includeLegs = TRUE
)

# View legs (first 9 columns)
trip$legs[1:9]
#>             startTime             endTime  distance mode duration
#> 1 2020-04-29 07:37:31 2020-04-29 07:38:59    98.057 WALK     1.47
#> 2 2020-04-29 07:39:00 2020-04-29 08:16:00 17872.820 RAIL    37.00
#> 3 2020-04-29 08:16:01 2020-04-29 08:19:43   245.949 WALK     3.70
#>                   agencyName                    agencyUrl routeType routeId
#> 1                       <NA>                         <NA>        NA    <NA>
#> 2 First TransPennine Express https://www.tpexpress.co.uk/         2 1:13081
#> 3 <NA> <NA> NA <NA>The otp_get_isochrone() function can be used to get one or more travel time isochrones in either GeoJSON or SF format. These are only available for transit or walking modes (OTP limitation). They can be generated either from (default) or to the specified location.
# 900, 1800 and 2700 second isochrones for travel *to* Manchester Airport by any transit mode
my_isochrone <- otp_get_isochrone(
  otpcon,
  location = c(53.36484, -2.27108),
  fromLocation = FALSE,
  cutoffs = c(900, 1800, 2700),
  mode = "TRANSIT",
  date = "04-29-2020",
  time = "07:15:00"
)

# function returns a list of two elements
names(my_isochrone)
#> [1] "errorId"  "response"

# now write the GeoJSON (in the "response" element) to a file so it can be opened in QGIS (for example)
write(my_isochrone$response, file = "my_isochrone.geojson")
# request format as "SF"
my_isochrone <- otp_get_isochrone(
  otpcon,
  location = c(53.36484, -2.27108),
  format = "SF",
  fromLocation = FALSE,
  cutoffs = c(900, 1800, 2700, 3600, 4500, 5400),
  mode = "TRANSIT",
  date = "04-29-2020",
  time= "07:15:00",
  maxWalkDistance = 1600,
  walkReluctance = 5,
  minTransferTime = 600
)

# plot using tmap package

library(tmap)
library(tmaptools)

# set bounding box
bbox <- bb(my_isochrone$response)
# get OSM tiles
osm_man <- read_osm(bbox, ext = 1.1)
# plot isochrones
tm_shape(osm_man) +
  tm_rgb() +
  tm_shape(my_isochrone$response) +
  tm_fill(
    col = "time",
    alpha = 0.8,
    palette = "-plasma",
    n = 6,
    style = "cat",
    title = "Time (seconds)"
  ) + tm_layout(legend.position = c("left", "top"), legend.bg.color = "white",
                main.title = "15-90 minute isochrone to Manchester Airport",
                main.title.size = 0.8)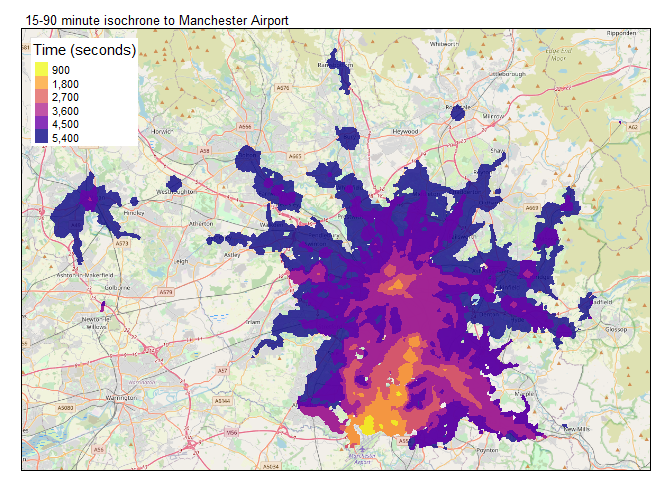
The example function calls shown above can be extended by passing additional parameters to the OTP API. Further information is available in the documentation for each function:
If you are new to OTP, then the best place to start is to work through the tutorial, OpenTripPlanner Tutorial - creating and querying your own multi-modal route planner. This includes everything you need, including example data. The tutorial also has examples of using otpr functions, and helps you get the most from the package, for example using it to populate an origin-destination matrix.
If you are already experienced with OTPv1 and want to try v2, you will need to build it from source. See this guide and this basic tutorial from the OTP project team.
For more guidance on how otpr, in conjunction with OTP, can be used to generate data for input into models, read An automated framework to derive model variables from open transport data using R, PostgreSQL and OpenTripPlanner.
citation(package = 'otpr').