|
Terms Used In Our Tutorials
>
The ">" can be used to indicate the order in which to click on words in the menu
bar and in the pull-down menus and on icons. For example:
Click File > New. The ">" between “File” and “New” means click on the word “File” and then click on the word “New”.
Bold
Bold is used so that certain words stand out; for example, words to be clicked
or to be typed are in bold.
Check mark
A mark,  , placed next to an item to show that it has been noted, verified, or
approved. , placed next to an item to show that it has been noted, verified, or
approved.
Click
The mouse is divided into two or three parts. The parts are called buttons.
Using your right hand, put your index finger (the finger that you use to
point) on the left button and put your middle finger on the right button.
Press the left button with your index finger and release it. This is called Clicking or Click.
Double-click
Click twice with your index finger on the left mouse button.
Right-click
Click once with your middle finger on the right mouse button.
Close
On the menu bar, click File. On the pull-down menu, click Close. (When a file has been changed, you will see a message that the document
has been modified, “Do you want to save the changes?” You will
see three buttons, Save, Discard and Cancel.) Click Save to save the file and the changes on the hard drive, Discard to remove the file and the changes from the screen but not from the hard
drive and Cancel to keep the file and the changes on the screen.
To Close a window. (Click the X in the upper right hand corner of the window.)
Default Template
When you open a new document with File - New, a blank document appears
based on a OpenOffice.org template. You can edit, modify, or replace this
template so that the new document contains your customized Styles or other
contents.
How to Create a Default Template
You will want to save your preferences for the page layout to replace the
default template that was in effect when you first downloaded OpenOffice.
-
Create a document with the content, formatting styles, the font name and
the font size of your choice.
-
Click File > Templates > Save.
-
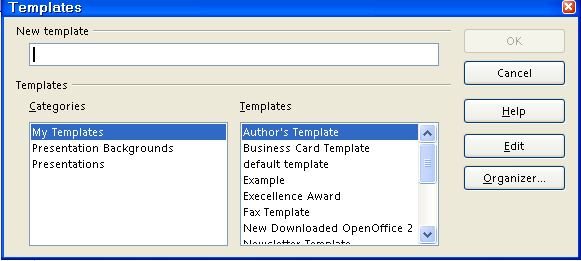
In the New template box, type a name for the new template
-
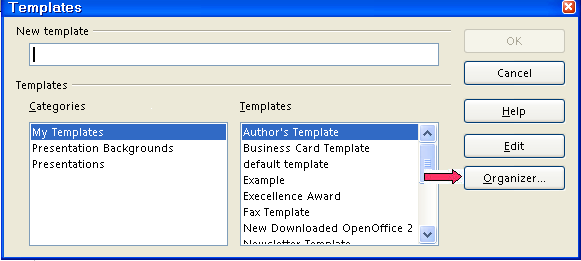
Click Organizer. (The “Organizer” button is the last button on the right.)
-
Double-click on My Templates. (A list of the saved templates appears.)
-
Right-click on the template that you created and choose Set as Default Template. (The “Templates” window closes.)
- The next time that you click New > Text Document, the Untitled page will have the formatting styles that you chose in Step 1 and any text that was typed in the template.
Delete
Highlight the word or words you want to delete by one of the following
methods:
-
Holding the left button on your mouse down and move the pointer over the
word or words.
-
Click one word or icon at the top or bottom of the section. Hold the Shift
key down and click the opposite end. The section will be highlighted.
-
Press and hold down the Shift key. The four arrow keys are located on the
bottom right side of the keyboard. Use the up arrow key and the left arrow
key to select the words.  Release the Shift key. Release the Shift key.
Press the Del (Delete) key.
Dragging
Dragging is done by clicking on the top blue line of the (Styles and Formatting,
Navigator, etc.) window and moving the mouse without letting go of the mouse button until the window is where you want to place
it.
Dragging is done by clicking on the graphic and moving the mouse without letting go of the mouse button until the graphic is where you want to
place it.
Extended Tips
A brief explanation of what happens when you click on this icon.
F11
If the Styles and Formatting window is not in view, press F11. To close the "Styles and Formatting" window, press the F11 key again.
Formatting toolbar
Fourth line from the top of the screen. The fourth line down is the Formatting Toolbar. Additional specific functions that can be done in Writer are on this
line.

Handles
Frames, graphics and pictures will appear on the page with an anchor on
the upper left and eight green squares, four of which are located in the
corners and one in the middle of each side. The green squares are called
"handles". To remove the handles, click anywhere on the page
other than in the frame, graphic or picture. Click the edge of any frame,
graphic, or picture to select it and the eight handles will reappear.
Highlight
You can make an object on a display screen stand out by displaying it in
a different mode (background becomes yellow or black and the print is white)
from other objects by doing one of the following:
-
Click and hold on the first word or letter while moving the pointer over
the word or section and when you reach the end of the section or letter
that you wish to highlight, release the mouse button.
-
Click one word or icon at the top or bottom of the section. Hold the Shift
key down and click the opposite end. The section will be highlighted.
-
Press and hold down the Shift key. The four arrow keys are located on the
bottom right side of the keyboard. Use the up arrow key and the left arrow key to select the words. Release the Shift key.
- While the selected block of text or letter is highlighted, you can make
formatting changes such as the font name and size, toggle bold, Italic,
and underlining on and off, alignment, spacing, toggle numbering on and
off, and font color. You can delete, copy, move, or replace the highlighted
block of text or letter.
Icons
The small pictures on the Standard and Formatting Toolbars are called icons.
On the 3rd and 4th rows from the very top of the screen, there are small pictures. These
pictures are called icons. Move the pointer of the mouse onto the each icon to see the name of the
icon.
Keyboard
The keyboard has keys that can be pressed to make characters (letters, numbers, and
symbols) appear on the screen.
Long-click
Some buttons have a small downward triangle,  , on the right which indicates that if you long click the button (i.e. press and hold), you will get a pull-down menu or window
that gives you more options for the function. For example, if you click
the New document button, you get a new document of the same type as the current
document open. If you long-click the button, you can select which type
of new document you want. , on the right which indicates that if you long click the button (i.e. press and hold), you will get a pull-down menu or window
that gives you more options for the function. For example, if you click
the New document button, you get a new document of the same type as the current
document open. If you long-click the button, you can select which type
of new document you want.
Margins
Words, numbers, and graphics can be placed anywhere on a sheet of paper
except for a small border at the four outer edges of the paper. The word
margin is used to describe the boundary lines where the borders end and the words
begin. All future added words, numbers, and graphics will stay within the
lines that indicate the margins. The margin lines appear on the screen
and will not appear on the printed page.
Menu bar
The line below the blue line with a row of words that starts with the word File is called the Menu Bar. Clicking on a word in the Menu Bar shows a list of things (a pull-down
menu) that you can choose to do in Writer.
Menus
The different words on the Menu Bar are different pull-down menus. The pull-down menu shows a list of things
that you can choose to do in Writer.
At the top of the window on the second row, there is a list of words. The
first word is File. Click on the word File by moving the mouse so that the arrow is touching the word "File",
then press and release the left button. (A list of available options appears
on the screen.) Click on the word New. (A second list of available options appears on the screen.) These lists of available options are called menus. You click on a word on the menu to select what you want to do.
Mouse and Mouse Pad
plural: mice
The device next to the keyboard is called a mouse. A mouse is a hand-held, button-activated input device that when rolled
along a flat surface directs an indicator to move correspondingly about
a computer screen allowing the operator to move the indicator freely to
select operations or manipulate text or graphics. Roll the mouse up and down on the mouse pad. When the mouse is moved up, the pointer (The pointer looks like a tall I and is called an I-bar.) will move up. When the mouse is moved down, the pointer will move down.
When the mouse is moved to the left or right, the pointer will move in
the same direction. (Do not roll the mouse off the mouse pad. When you
get to the end of the mouse pad, lift the mouse and put it on the center
of the mouse pad.)
The mouse pad is a piece of foam or plastic material on which the mouse is placed. NOTE:
Some mice work without a mouse pad. If you have one of those, just roll
the mouse around on your desk.
Pointer
The pointer looks like a tall  and is called an I-bar. The pointer appears as or as and is called an I-bar. The pointer appears as or as  depending on where the pointer is located on the screen. depending on where the pointer is located on the screen.
Press
Press means to touch a key on the keyboard hard enough to cause the character
to appear on the screen and then immediately release it. The letter keys
produce upper or lower case letters; use the shift key for upper case.
The number keys produce numbers or special characters; use the shift key
for the special characters.
Pull-down Menu
The pull-down menu is a menu that appears when various items are clicked
on.
Right-click
Right-click means to use your middle finger on the mouse button on the
right.
Right-hand
On the right side of anything.
Ruler
Click View. If there is a check mark by “Ruler”, a Ruler will appear at the top and at the left side of your page on the
screen. Right-click on the Ruler to see the choices for the settings which
are “Millimeter, Centimeter, Inch, Point, and Pica”. The numbers on the Ruler on the left side of the page indicate where the text is located on the
page from the top of the page. The numbers at the top of the page indicate
the location of the text from the left or right sides of the page.
Screen
The screen is the monitor screen which is like a TV screen.
Scroll
Scroll mean to move text or graphic display up, down, right or left so that more
of the material can be seen on your screen. There are two scroll bars, Horizontal and Vertical. The Horizontal Scroll bar (by clicking and holding the pointer, you can navigate a document left
and right) is located at the bottom of the page above the Status Bar which is the line at the bottom of the screen that starts with Page 1/1. The Vertical Scroll Bar (by clicking and holding the pointer, you can navigate up and down) is
located on the right side of your screen. Navigation can be done by:
-
Using the mouse scroll wheel
-
Using the up and down arrows and the left and right arrows in the Scroll
Bar on the right side of the screen.
-
Using click and hold on the scroll button on the right side of the screen
-
Repeatedly click or click and hold on the  or the or the  on the Vertical Scroll Bar on the right side of the screen or repeatedly click or click and hold on the on the Vertical Scroll Bar on the right side of the screen or repeatedly click or click and hold on the  or the or the  on the Horizontal Scroll Bar. on the Horizontal Scroll Bar.
Shift Key
The Shift key causes letters to be capitalized. Press and hold down the Shift key as you press the H key; then release the Shift key. (A capitalized H appears on the page.)
Shift Key Highlighting
Two Methods:
-
Click on the first word of the section. Hold the Shift key down and click
on the last word of the section. The section will be highlighted.
- Press and hold down the Shift key. The four arrow keys are located on the bottom of
the keyboard and left of the numeric keypad. Use the arrow keys to select
and/or unselect the lines and/or words. Release the Shift key.
Space bar
The Space bar key is the long key in the middle at the bottom of the keyboard.
Standard Toolbar
The third line down is the Standard Toolbar. Clicking on a small picture will make available a specific function that
can be done in Writer.

Status Bar
The line at the bottom of the screen that starts with Page 1/1 is the Status Bar. This line gives you information about the document that you are currently using.
Template
A template is a document or file having a preset format which is used as
a starting point for a particular application so that the format does not
have to be recreated each time it is used.
Text Flow
This feature controls the way that text is handled in a document before
and after a table which is in the document. It is also used to start each
chapter of a Master Document on a new page. The details may be found in Help which is opened by clicking on the word, Help, on the Menu Bar. Type text flow in the Search term box and when text flow is seen highlighted in the list, click on Display at the bottom of the list.
The Text Flow tab is used so that when the Master Document is printed,
each chapter starts on a new page. To do this:
Click Format > Styles and Formatting. Right-click on a Paragraph Style. Click Modify > Text Flow tab. In the “breaks” section, click Insert (Click to place a check mark before Insert). (The word “page” appears in the Type box and the word “before” appears in the Position box.)
Tips
When Tips is activated and you place the cursor on the icon, the name of
the icon will appear on the screen.
NOTE
Tutorials are improved by input from users. We solicit your constructive
criticism.
Click here to E-mail your suggestions and comments
Tutorial edited by Sue Barron and George Hans
Terms Used In Our Tutorials 10/26/06
Last modified: 2008-04-30 01:42 UTC
   
|

