|
|
 |
|
Image by: Sally Peterson
|
|
|
|
Simple Document Template Instructions Table of Contents This tutorial provides instructions for using the Simple Document Template. To do this tutorial, you have to download the template. Click here to download the template. It may be helpful to download and have a printed copy of the tutorial available as you do the tutorial. Click here to download the tutorial. Open The TemplateGo to where you saved the template. Click File > Open. Click on the Simple_Document_Template file. (“Simple_Document_Template” appears in the “File name:” pull-down menu.) Click OK. TitleThe template is formatted for the title of your document. At the top of the page, delete the X then type the name of your document. Headings
The “Heading 1” Paragraph Style is centered and is used for the heading of sections. “Heading 2” is Aligned Left and indented ½ inch. “Heading 3” is Aligned Left and indented 1 inch. “Heading 4” is Aligned Left and indented 1 ½ inch.
How Headings Will Appear In A DocumentTitleHeading 1(step 1 will go here)
(step 1 will go here)
(step 1 will go here)
(step 1 will go here) Use The Simple Document Template To Write Your Document
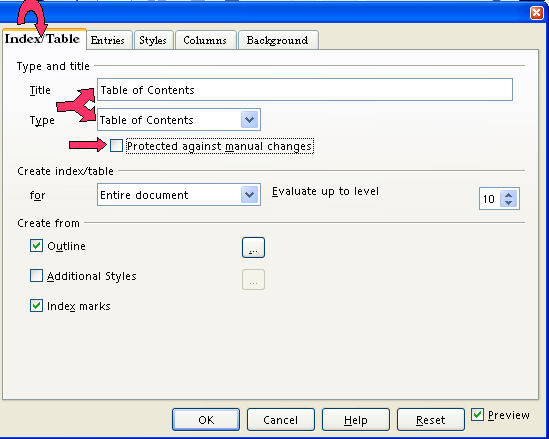
Create A Table Of ContentsWhen you are finished writing the tutorial, create a Table of Contents.
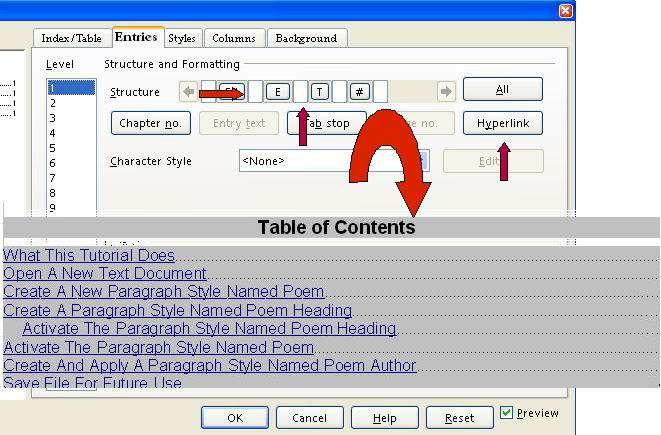
Add Hyperlinks To The Table Of ContentsWhen a word(s) in the Table Of Contents is clicked, the cursor will go to the location of that information. For example. “Add Hyperlinks to the Table of Contents” will be in the Table Of Contents of this tutorial. In the Table Of Contents, click the words “Add Hyperlinks to the Table of Contents” and the cursor will go to this section on this page.
NOTE Tuorials are improved by input from users. We solicit your constructive criticism. Click here to E-mail your suggestions and comment Tutorial donated by Sue Barron Simple Document Template Instructions 09/08/07
Last modified: 2008-04-30 01:42 UTC
|