|
Print An Envelope
This tutorial shows how to use OpenOffice to print a #10 envelope that
is 9.50" wide by 4.13" high. Using OpenOffice to print an envelope
is the easy part. The hard part comes when you set up with your printer.
Set Up Your Printer, Add The Address And The Return Address
If you try to print using the default settings on your printer, the printer
may feed through without printing and claim that you are out of paper.
Each printer has different rules for how it prints and it takes some experimenting
to find what those are. You need to tell your printer that you are printing
envelopes. There are several methods to do this.
Method 1 - Use The Envelope Wizard In OpenOffice Writer
Open A New Text Document
Click File > New > Text Document. (The  document appears.) document appears.)
The Envelope Wizard
- On the menu bar, click Insert > Envelope. (The
 window appears.) window appears.)
-
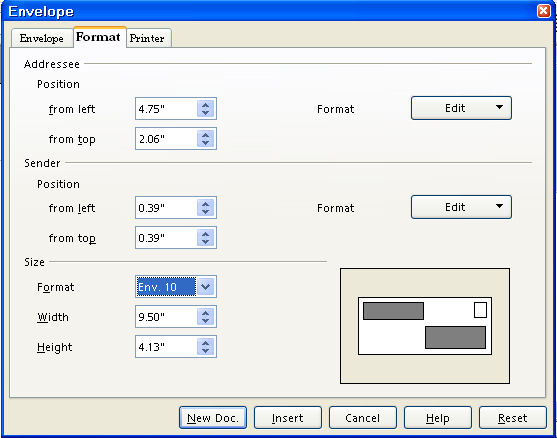
Click the Format tab. In the Size section, In the Format pull-down menu, select Env. 10. (The correct numbers appear in the “Addressee”, “Sender”,
and “Size” sections.)
- The window should appear as above with the numbers already added for the Addressee, (Position: from left and from top) Sender, (Position: from left and from top.) and Size (Format, the Width, and Height.)
Add The Address Using Method 1
-
Click on the Envelope tab. Click anywhere within the Addresses dialog box. (If you were in the document, you can copy/paste the address
to the "Addresses" dialog box.) Add an address of your choice.
For example, type the words Bob Smith then press Enter. (the cursor goes down to the next line) type the words 1 Main Street then press Enter. Type the words Denver, Colorado then press Enter. Type the numbers 12345.
- IF you want the envelope to have just the name and address of the person
receiving the letter (not have your return address on the envelope), remove
the check mark before the word, Sender.
Add The Return Address Using Method 1
-
IF you want to add your name and address to the envelope, leave the check
mark.
-
Click anywhere within the Sender dialog box.
- Type your name and address.
Method 2 - Use The Page Style: Default Window
Open A New Text Document
Click File > New > Text Document. (The document appears.)
Page Style: Default Window
- Click Format > Page or click Format > Styles and Formatting > Page Styles,
 , icon. , icon.
- Click the Page tab.
-
Under Paper Format, Format, click on the  and select Env. #10. and select Env. #10.
-
Click OK.

Add The Address Using Method 2
- Click Insert > Envelope. (The "Envelope" window appears.)
- Click on the Envelope tab. Click anywhere within the Addresses dialog box. (If you were in the document, you can copy/paste the address
to the "Addresses" dialog box.) Add an address of your choice.
For example, type the words, Bob Smith, then press Enter. (the cursor goes down to the next line) type the words 1 Main Street then press Enter. Type the words Denver, Colorado then press Enter. Type the numbers 12345.
- IF you want the envelope to have just the name and address of the person
receiving the letter (not have your return address on the envelope), remove
the check mark before the word, Sender.
Add The Return Address Using Method 2
-
IF you want to add your name and address to the envelope, leave the check
mark.
-
Click anywhere within the Sender dialog box.
- Type your name and address.
Method 3: Change The Printer Preferences In The Control Panel
Printing Preferences
- Click Start > Control Panel > Printers.
- Find your printer, right-click and choose Printing Preferences.
- Select the envelope size as the paper size you are using and click OK. (Remember to change the settings back when you stop printing envelopes.)
Open A New Text Document
Click File > New > Text Document. (The document appears.)
Add The Address Using Method 3
- Click Insert > Envelope. (The "Envelope" window appears.)
- Click on the Envelope tab. Click anywhere within the Addresses dialog box. (If you were in the document, you can copy/paste the address
to the "Addresses" dialog box.) Add an address of your choice.
For example, type the words Bob Smith then press Enter. (the cursor goes down to the next line) type the words 1 Main Street then press Enter. Type the words Denver, Colorado then press Enter. Type the numbers 12345.
- IF you want the envelope to have just the name and address of the person
receiving the letter (not have your return address on the envelope), remove
the check mark before the word, Sender.
Add The Return Address Using Method 3
-
IF you want to add your name and address to the envelope, leave the check
mark.
-
Click anywhere within the Sender dialog box.
-
Type your name and address.
Envelope Orientation
-
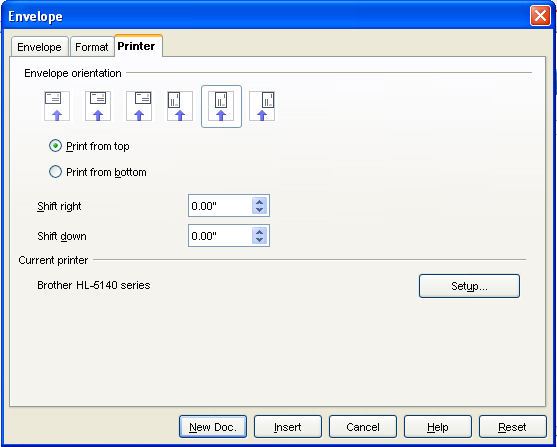
Click on the Printer tab. (The screen below appears.). Select your printer's Envelope orientation (how your printer wants envelopes inserted).
-
Long side in first or short side in first
-
Placement in the Printer tray
-
Select Print from Top or Print from bottom
-
The name of your printer will be displayed under Current printer.
-
Click on the New Doc button. (An image of how the envelope will be printed will appear on your
screen)
-
IF you want to change your return address information (Sender) or the addressee
information, click in that box and make the changes.
Envelopes And Databases
If you have a database set up for addresses, it is easier to bring the
data from the database than to type each address.
-
Set up your printer according to the instructions in Set Up Your Printer.
-
Click View > Data Sources.
-
Find the data source where your address information is located.
-
Expand the table to find where the data is located.
-
Select that table.
-
Click on the title of the field such as Firstname and drag it into the Addresses dialog box in your document.
-
Click the space bar to add a space, then drag the next field such as Lastname.
-
Press Enter to make a line and continue the procedure until you have the address in
the Addresses dialog box.
Print An Envelope
-
Have an envelope in your printer feed tray. Be sure that your printer is
expecting the correct size of the envelope.
-
Click File > Print.
Print More Envelopes
When you find your printer's specific rules and want to print more envelopes,
do one of the following:
-
Open the document you used before and type in new information.
Or
-
If you like Templates, open the Document.
-
Click File > Templates > Save.
-
Name the template Envelope.
-
Click OK.
-
When you want to print more envelopes, click File > Templates and Documents > Templates > My Templates > Envelope.
NOTE
Tutorials are improved by input from users. We solicit your constructive
criticism.
Click here to E-mail your suggestions and comments
Edited by Sue Barron
Print An Envelope 05/20/07
Last modified: 2008-04-30 01:42 UTC
  
|

