|
Pictures In Text Files
This tutorial has three parts.
Part 1 uses MS paint that comes with Microsoft Windows to edit (crop) the picture.
You will take a picture of what is on your screen, edit (crop) that picture,
add an arrow, save the picture, and paste the picture into an Open Office
Writer document.
Part 2 uses Writer in place of MS Paint to edit (crop) the picture.
Part 3 explains how to insert picture in a Writer document.
Part 1
Open a new text document
Click File > New > Text Document. (the  document appears. document appears.
Copy a Picture to the Clipboard
Copy a picture of what now appears on your screen.
-
Press the Print Screen key (It may be named Print Scrn or PrtSc or some similar name.) (On some keyboards, you have to press and hold
the Shift key then press the Print Screen key.)
- You won't see anything happen, but a picture of the screen was copied to
the clipboard.
Crop A Picture Using MS Paint
-
Open the Paint program by clicking Start > All Programs > Accessories > Paint. (The Untitled – Paint window appears.)
-
Click Edit > Paste. (A picture of the screen appears and the picture is within the Paint
program.)
-
For this tutorial you will keep just the Standard Toolbar. (You are going to crop [cut off everything else] and
leave just the Standard Toolbar)

-
Click on the rectangle-shaped Select ,  , icon. Move the mouse point onto the Writer page. (The mouse pointer becomes , icon. Move the mouse point onto the Writer page. (The mouse pointer becomes
 ) Position the mouse pointer at the top left corner of the Standard Toolbar. Press and hold down the left mouse button to drag the mouse pointer to the bottom right corner of the Standard Toolbar. A rectangle drawn with dashes appears around the Standard Toolbar.) ) Position the mouse pointer at the top left corner of the Standard Toolbar. Press and hold down the left mouse button to drag the mouse pointer to the bottom right corner of the Standard Toolbar. A rectangle drawn with dashes appears around the Standard Toolbar.)
-
In the Paint program, click on Edit > Copy. You won't see anything happen, but the picture of the Standard Toolbar
is copied to the clipboard.
Add An Arrow
-
At the bottom of the screen, click Untitled 1 – O... to get back into the Writer program. ( appears at the top of the screen)
-
Right click anywhere on the Writer page. (A menu appears.) Click Paste. (A picture of the Standard Toolbar appears on your screen)
-
Right click on the picture of the Standard Toolbar. (A menu appears) Click Anchor > As Character.
-
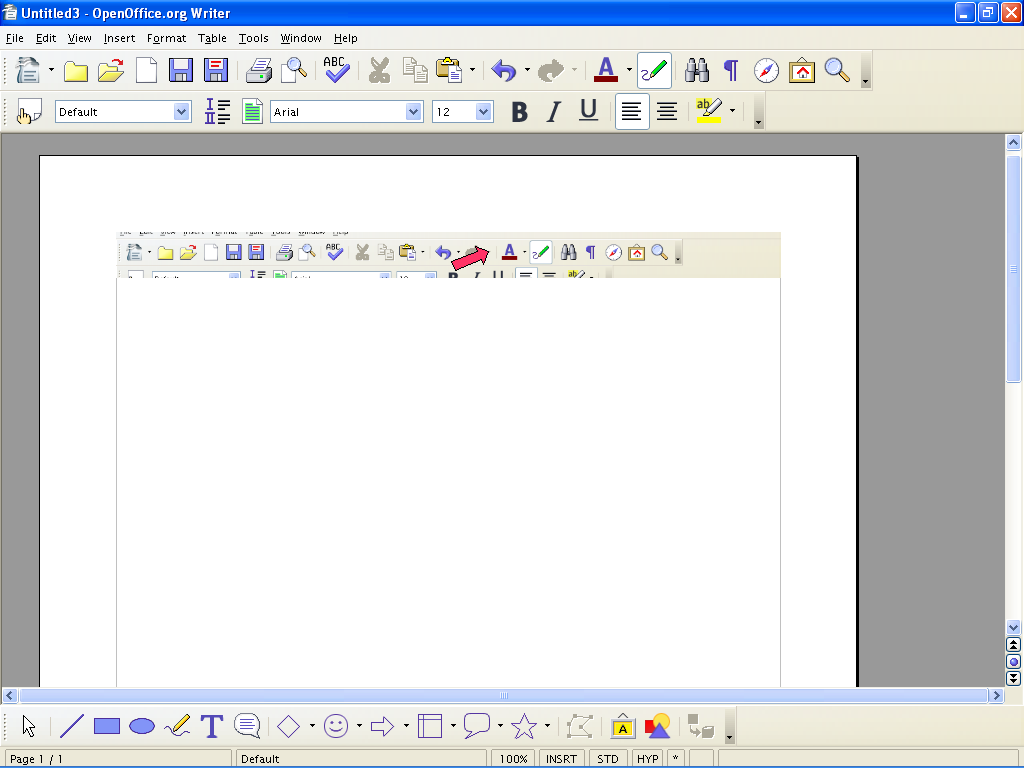
At the 2nd line from the top of the screen, on the Standard Toolbar [not the picture
of the Standard Toolbar] click on the Show Draw Functions  icon. (The Drawing Toolbar appears at the bottom of the screen.) icon. (The Drawing Toolbar appears at the bottom of the screen.)


-
On the Drawing Toolbar, click on the triangle, that is just after the Block Arrows,  . (A pull-down menu of images appear) . (A pull-down menu of images appear)
-
Click on the  arrow. (The mouse pointer becomes ) (on the 3rd line from the top of the screen, the Drawing Object Properties toolbar appears below the Formatting Toolbar.) arrow. (The mouse pointer becomes ) (on the 3rd line from the top of the screen, the Drawing Object Properties toolbar appears below the Formatting Toolbar.)
-
Place the mouse pointer where you want the top of the arrow to appear. Click and drag to draw the arrow. (Press and hold down the left mouse button than move the mouse
down to draw the length of the arrow and move the mouse to the right to
draw the width of the arrow. Release the mouse button) (The arrow appears
in the document.
-
To change the color of the arrow, right-click on the arrow. (A menu appears.) Click Area. (A menu appears with a list of colors.) Scroll up and click Red 1. (The arrow becomes red.)
-
Click anywhere on the page to eliminate the green handles around the arrow.
Copy the Standard Toolbar with the arrow to the Clipboard
-
Press the Print Screen key (It may be named Print Scrn or PrtSc or some similar name.) (On some keyboards, you have to press and hold
the Shift key then press the Print Screen key.)
- You won't see anything happen, but a picture of the screen was copied to
the clipboard.
Crop the picture using MS Paint
-
At the bottom of the screen, click on Untitled – Paint (The MS Paint program appears on the screen.)
-
Click Edit > Paste. (A picture of the page appears in MS Paint))

-
Click on the rectangle-shaped Select , , icon. Move the mouse point onto the Writer page. (The mouse pointer becomes
a ) Click and drag to select the picture seen above. (The Standard Toolbar
and arrow are now one picture)
-
In the Paint program, click on Edit > Copy. You won't see anything happen, but the picture of the Standard Toolbar
with the arrow is copied to the clipboard.
-
Open a new Writer text document. (Untitled 2 – OpenOffice .org Writer
appears) Click Edit > Paste. (The picture with the arrow appears)
-
Click File > Save As. Save the file with a name of your choice.
Part 2
Use Writer to Crop and save a Picture
To get the Standard Toolbar with the arrow that we did in Part 1, we have
to repeat the procedure for 'Copy A Picture To The Clipboard” and “Crop
the Picture” until you have the Standard Toolbar with the arrow.
-
Follow the steps in the section, Copy A Picture To The Clipboard.
-
Click Format > Picture > Crop tab.
-
Using Left, Right, Top and Bottom, click on the  of each until you have just a picture of the Standard Toolbar. of each until you have just a picture of the Standard Toolbar.
-
If you wish, you can rotate the arrow by clicking on the Rotate icon,  , on the Drawing Object Properties Toolbar at the top of your screen. (When you do this, make sure the arrow
has the green handles around it; if it doesn't, click on it first to make
it so.) Red handles appear around the arrow and the mouse cursor changes
when you put the cursor over one of the handles. , on the Drawing Object Properties Toolbar at the top of your screen. (When you do this, make sure the arrow
has the green handles around it; if it doesn't, click on it first to make
it so.) Red handles appear around the arrow and the mouse cursor changes
when you put the cursor over one of the handles.
-
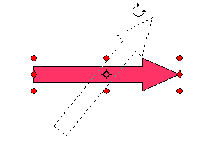
Click and drag a red handle to perform the rotation until the arrow is oriented as you wish. (A dotted
drawing of the arrow's outline indicates the orientation of the new arrow.)
-
Note: At this point, you can save the document with the Standard Toolbar with
the arrow and when you reopen the document, the arrow will be on the Standard
Toolbar; however, the Standard Toolbar with the arrow cannot be copied
and pasted anywhere else in the document or in another document. If you
try, you will lose the arrow.
Part 3
Insert An Image (Picture)
Insert Above Or Below Text
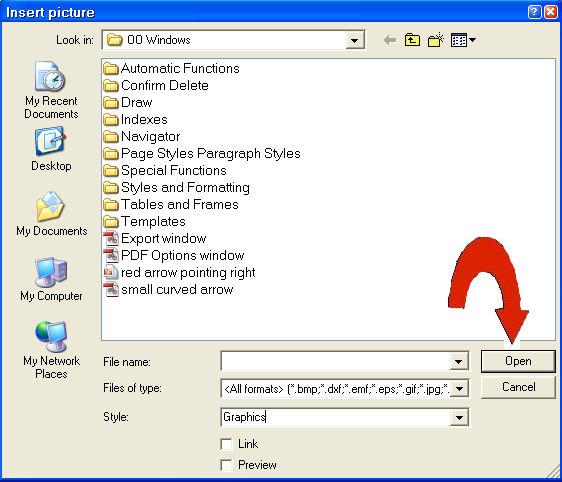
- Click Insert > Pictures > From File. (The “Insert picture” window will appear.)
-
Click on an image (picture) from the Insert picture window. Click the Open button. (The image (picture) appears on your document. There are small
green squares called handles at the edges of the image (picture) that indicate
the image (picture) can be manipulated.)
- To anchor the image (picture) above or below the text, click Format > Anchor > As Character.
Insert Image (Picture) In Your Text
Adjust The Height Of The Image (Picture)
If the height of the selected item is greater than the current font size,
the height of the line containing the item is increased. Adjust the height
of the image (picture) so that it has little effect on the text line by
resizing the image.
-
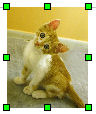
Click on the image (picture). (An anchor, , will appear. Eight points (green squares), called "handles", will appear along the sides of the
image [picture].) , will appear. Eight points (green squares), called "handles", will appear along the sides of the
image [picture].)
-
Place your pointer on any of the handles (points). To keep the proportions of the image (picture), press and hold
the Shift key. Click and drag a handle of the image (picture) to modify the image (picture). (A double-headed arrow ,. , will appear.) Release the mouse button to complete the resize. , will appear.) Release the mouse button to complete the resize.
- When you have changed the image (picture) to the desired size, click anywhere on the page except on the image (picture). (The image [picture] will be the desired size.)
Insert The Image (Picture) Between Words In Your Text
-
Click on the desired location for your image (picture). Right click on
the image (picture). (A menu will appear.) Click Wrap > Wrap Through In Background.
-
Click on the image (picture). (The pointer becomes .) Drag the image (picture)
to the desired location in your text (slightly lower than the text).
-
Right click on the image (picture) again. Click Anchor > As Character. (The image (picture) will stay in place when you open and close the document.
You can add or delete spaces between the image (picture) and the text.
You can move the image (picture) up or down to adjust the space between
paragraphs or lines of the text.)
NOTE
Tutorials are improved by input from users. We solicit your constructive
criticism.
Click here to E-mail your suggestions and comments
Edited by Sue Barron
Pictures In Text Files 02/10/08
Last modified: 2008-04-30 01:42 UTC
  
|

