|
Miscellaneous Information
The help on this tutorial from Harvey S. Frey MD PhD Esq. Is appreciated.
File Formats Are Different In OpenOffice 2.0
-
The new OpenOffice 2.0 version has different file formats than the older
OpenOffice 1.x.x versions. The 2.0 version can open, use, and save the
older 1.x.x files. When you use the 2.0 version, all the older 1.x.x files
are available and fully usable.
-
The older OpenOffice 1.x.x versions cannot use the new 2.0 files. After
you have installed 2.0 and tried it to verify that the installation was
successful, you can delete the older versions of OpenOffice to reclaim
some space on your computer.
- To delete an older version of OpenOffice, click Start > Control Panel. Double-click on the Install or remove programs and Window components icon > Remove. This will not remove any of the OpenOffice files that you have created such as Writer or Calc files.
Convert An OpenOffice 1.1.x .sxw Text File To A 2.0 .odt Text File
After conversion, both the 1.1.x (.sxw) text file and the 2.0 (.odt) text
file will be on the computer. To convert, do the following two steps.
Step 1: Open The 1.1.x File From Within A 2.0 File
- Be in the 2.0 version. Start > All Programs > OpenOffice 1.1.x > OpenOffice.org Writer) (The file,
 , appears on the screen.) , appears on the screen.)
- Click File > Open. Search to find the 1.1.x file and then click on that file. Click the Open button. (The name of the file will appear in the “File name:”
box. The file appears on the screen in the 2.0 format. The file name, on
the top blue line, will start with the 2.0 icon, followed by the file name,
followed by the .sxw extension, followed by - OpenOffice.org Writer. Note:
The .sxw extension is misleading since the .sxw is from the older 1.1.x
file that opens in 2.0 as a 2.0 file.)
Step 2: Save In The 2.0 Format
-
Click File > Save As. (The “Save As” window appears.)
-
In the Save as type: dialog box, select OpenDocument text (.odt). (Scroll up to find the “OpenDocument Text.odt”.)
-
In the Save in: dialog box, select the desired folder. Click the Save button. (The file is saved in the 2.0 format and the file appears on the screen
in the 2.0 format.)
NOTE: The same name may be used for the 1.1.x file and the 2.0 file. The extension
associated with the files will indicate which file is a 1.1.x file and
which file is a 2.0 file.
NOTE: In Step 1: the file opens in the 2.0 format. The 1.1.x file that was
opened is still on the computer as a 1.1.x file.. In Step 2: the 2.0 file
is saved as a 2.0 file.
NOTE: If there are graphics in the file and the 2.0 file is opened, the graphics
will be seen. If there are graphics in the file and the 1.1.x file is opened,
the graphics will be NOT be seen.
Save A 2.0 file In The 1.1.x File Format
Do the following to save a 2.0 file into a 1.1.x format:
-
Click File > Save As. (The “Save As “window appears.)
-
In the Save as type: dialog box, select OpenOffice 1.0 text document (.sxw). In the Save in: dialog box, select a folder of your choice. Click the “Save” button. (The file is saved in the 1.1.x format and the 2.0 file is still on the screen.)
Spellcheck
The Standard installation of 2.0 sets Spellcheck as the default setting . The country where the downloading server is located
determines which dictionary is used. The United States servers will make the USA dictionary the default. The
United Kingdom servers will make the UK dictionary the default.
Words that are misspelled will have a wavy red line under them. IF a word is spelled correctly AND has the red wavy line under it, the dictionary can be modified to remove
the red line under the correctly spelled word. From then on, that word
will not have the red wavy line under it.
Add Correctly Spell Words To The Dictionary
-
Right-click on a correctly spelled word that has a red wavy line under it.. (A menu appears.)
- Click Add > standard.dic. (The wavy red line is gone.)
Misspelled words Can Be Corrected By Doing The Following:
-
Right-click on the misspelled word. (A menu appears.)
-
In the top half of the menu, click on the correctly spelled word. (The
menu closes and the spelling of the word has been corrected.)
The complete document or a highlighted section can be checked for spelling errors by clicking the Spellcheck,  , icon on the Menu Toolbar. , icon on the Menu Toolbar.
Thesaurus (Synonyms)
-
To find a synonym for a word, click on that word.
-
Click Tools > Language > Thesaurus. (The “Thesaurus” window appears. The English (USA) version
or some other version, depending on the country you selected for the server when you originally
downloaded OpenOffice, will be in the window,)
-
In the Meaning pull-down menu, select a meaning. In the Synonym dialog box, select a word. Click the OK button.
WordPerfect
WordPerfect files can be opened by the 2.0 version. The files could not
be opened by previous versions of OpenOffice.
Microsoft Office (Save/Open/Convert MS Documents)
Files in Microsoft Office format can be opened with OpenOffice. The opened file can be modified and saved again in either Microsoft Office
format or in OpenOffice format.
-
To save files in either format, click File > Save As. In the Save as type: dialog box, select the format of choice.
-
OpenOffice can convert all Microsoft Office files into OpenOffice format files by using the Document Converter.
-
Click File > Wizards > Document Converter. (“Document Converter” window opens.) To convert text documents,
under Select the document type for conversion:, select Microsoft Office and then select Word documents.
-
PowerPoint and Excel documents can also be selected for conversion to OpenOffice format.
Change The Default Setting For Saving Documents
-
Click Tools > Options > Load/Save > General.
-
Select a type of document in the Document type pull-down menu. (In "Writer", you might select "Text document.")
-
In the Always save as pull-down menu, select the format of your choice. (For a Writer Text Document,
you would probably select “OpenOffice Text”, not Microsoft
Word. Not using "OpenDocument Text (.odt)" as the default format
may cause formatting or content to be lost.)
E-Mail In An OpenOffice Document
-
Be in the file that is to be attached to the E-Mail.
-
Click File > Send > Document as E-mail (or click the "Document as E-mail",  , icon on the "Standard Toolbar".) (In your email server, the
"Compose: (no subject)" window will appear.) , icon on the "Standard Toolbar".) (In your email server, the
"Compose: (no subject)" window will appear.)
-
Write the E-Mail as you usually do. When written, send as you usually do.
(The file is attached to the E-mail.)
Note: This works only when you have an email client program such as Outlook
or Mozilla Thunderbird. If you use webmail such as Yahoo and Hotmail, this
will not work. You will get a message: “OpenOffice.org was unable
to find a working e-mail configuration. Please save this document locally
instead and attach it from within your e-mail client.”
Rich Text File Format (RTF)
Rich Text formatted files are often called RTF files. RTF files can be opened and used with any word processor, including OpenOffice, WordPad, NotePad, Word, and Star Office. An OpenOffice file can be saved in RTF. The RTF format can be a good way for OpenOffice to exchange text files with users of other operating systems such as Microsoft
Word.
Save A File In The PDF Format
PDF files can be opened by anyone who has the free Adobe add-on. To get the free add-on, go to http://www.adobe.com/products/acrobat/readstep2.html
and download.
-
Click File > Export as PDF . (The “Export” window appears.)
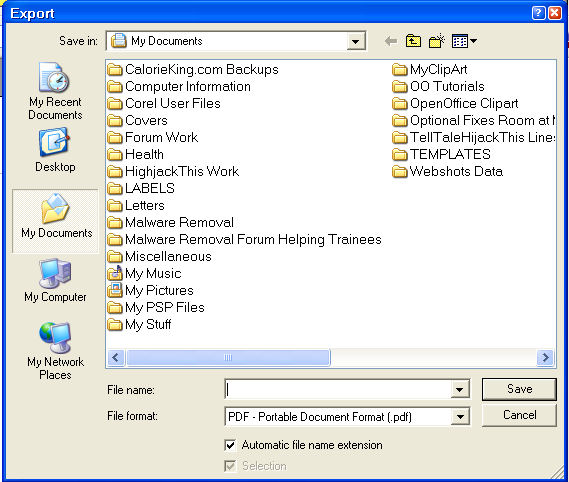
-
In the “Save in:” dialog box, select a folder. In the “File name:” dialog box, enter a name. Click the Save button. (The “PDF Options” window appears.)
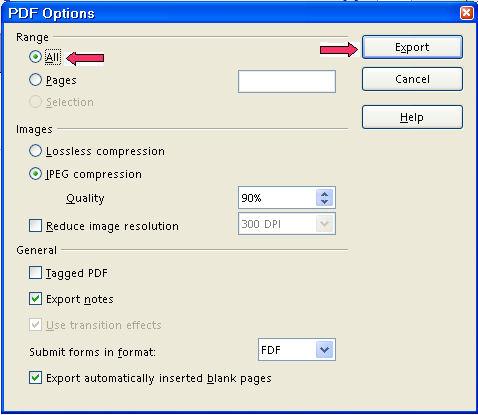
-
Under Pages, select All or Range. Click the Export button. (The file will be saved in the folder selected above in the PDF format. The file was “exported” to your computer).
-
PDF files cannot be edited. To get around this limitation, write the file
as a regular OpenOffice file and save the file as both an OpenOffice file and a PDF file. Edit the OpenOffice version and save as the PDF file.
Java Run Time Environment (JRE)
-
If JRE is not installed, an error message may appear saying that something cannot
be done in OpenOffice because JRE is not installed.
-
A free download of JRE is available at http://www.java.com/en/download/manual.jsp
-
On the the JRE download web page, click on the operating system you are using.
Insert Dates
Today's Date (Insert In A Document)
-
Put your cursor where the date is to be placed.
- Click Insert > Fields > Date. (Today's date will be inserted in mm/dd/yy format.)
Date – Selected (Insert In A Document)
-
Put your cursor where the date is to be placed.
-
Click Insert > Fields > Other. (“Fields” window appears.) Document tab is selected.
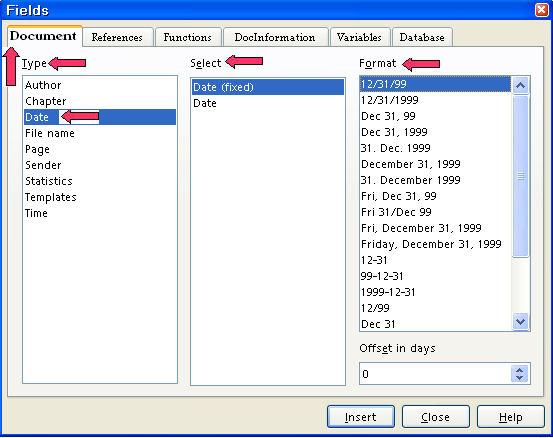
-
Under Type, select Date.
-
Under Format, select a format. (For example, if you select December 31, 1999, November
24, 2006 will appear as today's date.)
-
Click Insert > Close.
Icons (Change Size Of Icons Within OpenOffice)
With OpenOffice open or in an OpenOffice document. Click Tools > Options. IF there is a + in the box before the words “OpenOffice.org”, click on the + . A – (a dash) will appear in the box. Click View. In the Toolbar icon size box select Small, Large, or Automatic. Click OK.
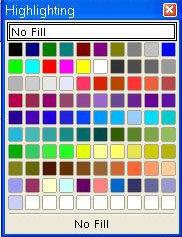
Highlighting (Background Color)
Highlighting changes the color behind a word on the page. One letter, one
word, or a selection of words can be highlighted.
-
Select the letter, word, or words to be highlighted.
-
Long-click on the Highlighting  icon which is located on the Formatting Toolbar. ("Long-click" means to press and hold the mouse key until you
get a pull-down menu or window that gives you more options for the function.
The "Formatting Toolbar" is the 4th line from the top of the screen. A pull-down menu appears with a color
palette.) icon which is located on the Formatting Toolbar. ("Long-click" means to press and hold the mouse key until you
get a pull-down menu or window that gives you more options for the function.
The "Formatting Toolbar" is the 4th line from the top of the screen. A pull-down menu appears with a color
palette.)
-
Click on the color of your choice.
Line Numbering
Activate Line Numbering For A Page
-
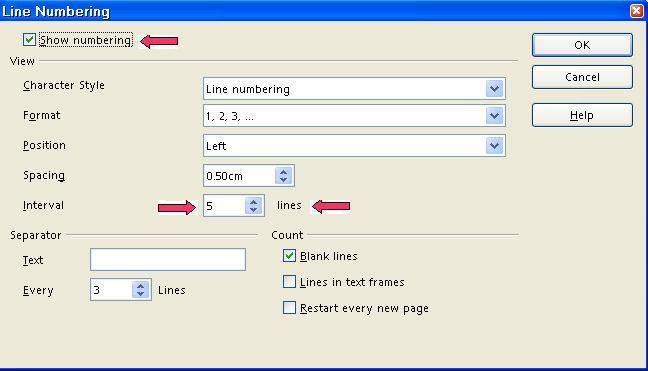
Click Tools > Line numbering. (The "Line Numbering" window appears.)
-
Click on the words, Show Numbering to put a check mark (if it is not already there). Under Interval, select 5 or the number of your choice. (Select the number by highlighting the number
in the "Interval" dialog box and typing the number.) Click OK. (A check mark appears before "Show Numbering".)
-
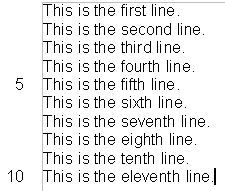
Every 5th (or the number of your choice) line will have the line count in the left
margin of the page.
Footer
-
Click Insert > Footer > Default. (The Footer appears at the bottom of the page. The cursor is flashing
at the left margin of the Footer.)
-
To add data, click in the Footer and move the cursor to where the data will be placed. Click and then add
the data of your choice.
-
To move the cursor back onto the page itself, click on the page.
Page Numbering And Page Count
-
Click in the Footer. Type the word, Page, then press the Space bar. Click Insert > Fields > Page Number. (Page 1” appears in the Footer.)
-
Optional additional step: Press the space bar, then type the word of, then press the space bar. Click Insert > Fields > Page Count. (Page 1 of 1” appears in the footer.)
-
Click anywhere on the page. (The cursor appears on the page.)
Page Numbering (Page 1 Starts On The Second Page.)
The First Page Does Not Have A Number.
-
Click File > New > Text Document.
-
Click Format > Styles and Formatting > Page Styles.
-
Right-click in the Page Styles window and click New.
-
In the Page Style window, click Organizer. Name the new page style Restarting Page Numbers. Click the Footer tab > Footer on > OK.
-
Click on the 1st Page of your document. (The page that you do not want to have a page number.)
-
Click Format > Paragraph (The "Paragraph" window appears.)
-
Click Text Flow tab. Under Breaks, select Insert. (“Type has “Page “ selected in the dialog box. Position has “Before” selected in the dialog box.)
-
Under Breaks, select With Page Style. In the dialog box below Type, click on the  and select Restarting Page Numbers. In the Page number dialog box, select 1. Click OK. (A footer appears in the document on the 2nd Page. There is no footer on the 1st Page.) and select Restarting Page Numbers. In the Page number dialog box, select 1. Click OK. (A footer appears in the document on the 2nd Page. There is no footer on the 1st Page.)
-
Click in the footer, type the word Page then press the Space Bar. Click Insert > Fields > Page Number. (“Page 1” will appear in the footer on 2nd Page.)
-
Optional additional step: Press the space bar, then type the word of, then press the space bar. Click Insert > Fields > Page Count. (Page 1 of 1” appears in the footer.)
Word Count
Click Tools > Word Count. (A menu appears with the number of words and characters in "Current
selection" or the "Whole document".)

Horizontal Ruler (Change Between Inches Or Centimeters)
Right-click on the ruler. Select inches or centimeters.
Name Of File On Top Blue Title Bar Line
Have a different name appear on the blue Title Bar at the top of the screen.
-
Click File > Properties > Description tab.
-
Enter a name in the Title box then click OK. (The name you entered will be on the Title Bar. The name of the file
itself will not be changed.)
Tips
When the Tips feature is activated and the cursor is placed over an Icon, the name of the icon will appear on the screen.
-
Click Tools > Options. (The “Options – OpenOffice.org - User Data” window appears.) If there is a + before the "OpenOffice.org", click on the +. (A menu appears directly below the words “OpenOffice.org.) Click
General. (The “Options – OpenOffice.org – General” window
appears.) Do either 2 or 3 below.
-
IF there is no check mark before the word, Tips, click on the word, Tips, to place a check mark before the word, Tips. (The menu closes and the "Tips" feature is activated.)
-
IF there is a check mark before the word “Tips”, click the OK button. (The window closes and the cursor goes back to the document. The
"Tips" feature is activated.)
Change The Font Color Of A Word(s)
-
Highlight the word(s) that you want to change the color. (Click on the first letter of the word(s) The cursor appears just before the word. Hold down the Shift key and press the  or the or the  for a section until the word(s) have been highlighted.) for a section until the word(s) have been highlighted.)
-
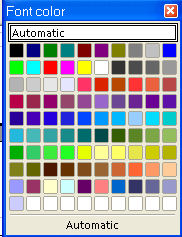
Long-click on the Font Color icon. (The “Font Color”  icon is on the 4th line from the top of the screen. To do a long-click, press and hold the
mouse button until you get a pull-down menu or window that gives you more options for the
function. A pallet of colors appears in a window.) icon is on the 4th line from the top of the screen. To do a long-click, press and hold the
mouse button until you get a pull-down menu or window that gives you more options for the
function. A pallet of colors appears in a window.)
-
Click on the color of your choice. (The window with the pallet of colors closes. The “Font Color”
icon now has the color of your choice under the A.)
-
Quick-click on the Font Color icon. Press the mouse button and quickly release the button. Release the
click quickly so it does not become a long-click. (The word(s) are in the
color of your choice).
AutoCorrect
In the AutoCorrect window, there are several choices to customize AutoCorrect for your use.
Capitalize first letter of every sentence is the default setting in the
initial installation of OpenOffice. To change this setting, do the following:
Tools > AutoCorrect > Options tab. Add or remove check marks before Capitalize first letter of every sentence.
Entering Text In One Column And Moving The Cursor To The Other Column In
Writer
If you are near the end of the column, you may press Enter repeatedly until the cursor is moved to the second column.
OR
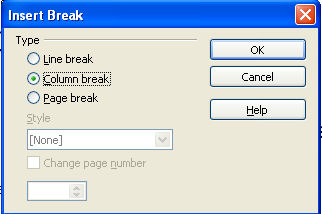
Click where you want to stop in the column. Click Insert > Manual Break > Column break.
Databases
OpenOffice has its own version of basic built. This is not compatible with Visual
Basic. Some help may be found in the Macro's Documentation section of www.openoffice.org
NOTE
Tutorials are improved by input from users. We solicit your constructive
criticism.
Click here to E-mail your suggestions and comments
Edited by Sue Barron
Miscellaneous Information 07/09/07
Last modified: 2008-04-30 01:42 UTC
  
|

