|
MASTER DOCUMENT FOR MY COOKBOOK
What This Tutorial Does
A Master Document coordinates separate documents so that they act like one document. The separate documents
can be modified by individuals working independently.
This tutorial shows you how to create a separate document for each chapter
of a book. A Master Document is then created that coordinates the individual
chapters into one book. The book can be printed, has a Table Of Contents,
an Index, and numbered pages.
Create The "Introduction" Document
Modify And Apply Heading 1 Paragraph Style
-
Click File > New > Text Document. ( appears.) appears.)
-
Click File > Save As. In the Save in: pull-down menu box, click My Documents if it is not already selected. In the Save as type: pull-down menu box, click OpenDocument Text (.odt) if it is not already selected.
-
In the File name: box, type Introduction then click the Save button. ( appears on the screen. A copy of the file has been saved.) appears on the screen. A copy of the file has been saved.)
-
Type the word, Introduction.
-
Click Format > Styles and Formatting. (The "Styles and Formatting" window appears.) Click on the Paragraph Styles  icon if it is not already selected. (The "Paragraph Styles" menu appears. The list of words in the
window is the names of Paragraph Styles that are available for use with
paragraphs. To see a list of "all the Paragraph Styles" available,
in the dialog box at the bottom of the "Styles and Formatting"
window, click the icon if it is not already selected. (The "Paragraph Styles" menu appears. The list of words in the
window is the names of Paragraph Styles that are available for use with
paragraphs. To see a list of "all the Paragraph Styles" available,
in the dialog box at the bottom of the "Styles and Formatting"
window, click the  and scroll until you can select All Styles.) and scroll until you can select All Styles.)
-
Right-click Heading 1. (A small menu appears. 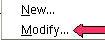 ) Click Modify. (The "Paragraph Style: Heading 1" window appears.) ) Click Modify. (The "Paragraph Style: Heading 1" window appears.)
-
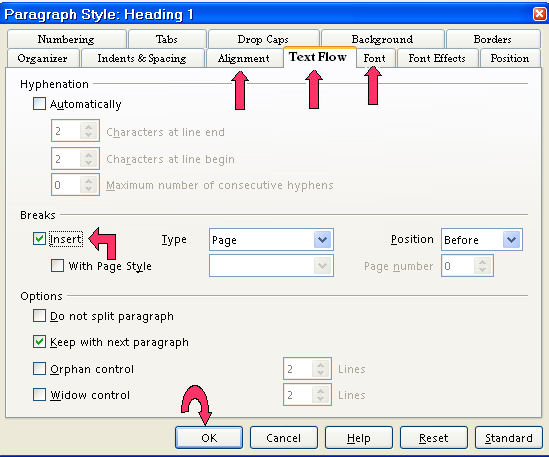
Click on the Alignment tab. In the Options section, click on the word Center. (A dot appears before the word “Center”.)
-
Click the Text Flow tab. (The Text Flow tab is used so that when the Master Document is printed,
each chapter starts on a new page.) In the Breaks section, click Insert. (Click to place a check mark before Insert. The word “Page” appears in the Type box and the word “Before” appears in the Position box.)
-
Click on the Font tab. If it is not already selected/highlighted, click Arial ("Font) > Bold ( “Typeface”) > 16 pt. (“Size”) > OK. (The “Size” may be specified in percent or in points. To change
from percent to points, delete the number in the upper “Size”
box and type a number followed by the letters, pt., such as 25pt. To change
from points to percent, delete the “Size” number and type a
number followed by the percent symbol such as 25%.)
- In the Styles and Formatting window, double-click on Heading 1. (The word, "Introduction" moves to the center of the line. The word is darker (Bold) and larger than before.)
Select Index Entries For "Introduction" And Save "Introduction"
-
On the first page, click on the word, Introduction.
-
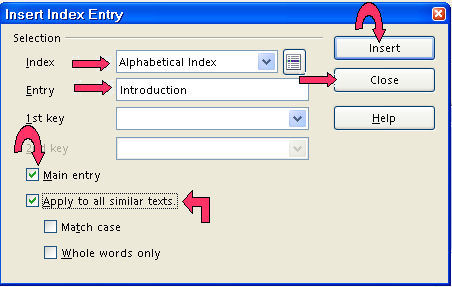
Click Insert > Indexes and tables > Entry. (The "Insert Index Entry" window appears. The word “Introduction” is entered in the “Entry” dialog box.)
-
In the Type pull-down menu, select Alphabetical Index, if it is not already selected. Click on the words Main Entry. (A check mark appears before the words, “Main Entry”.) Click on the box before "Apply to all similar texts". (A check mark appears before the words, "Apply to all similar texts".)
-
Click Insert. (There is no indication that anything happens.)
-
Click Close (The "Insert Index Entry" window closes.)
-
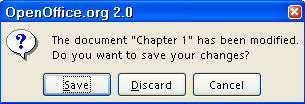
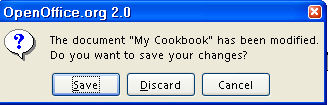
Click File > Close. (You will see the message below. ) 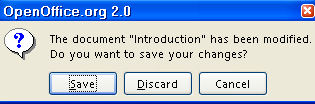
-
Click Save. (The file named “Introduction” is saved for later use in
this tutorial.)
Create The “Chapter 1” Document
Modify And Apply The “Heading 1” and Modify The"Heading
2" Paragraph Styles
-
Click File > New > Text Document. ( appears.)
-
Click File > Save As. In the Save in: pull-down menu box, click My Documents if it is not already selected. In the Save as type: pull-down menu box, click OpenDocument Text (.odt) if it is not already selected.
-
In the File name: box, type Chapter 1. Click the Save button. ( appears. A copy of the file has been saved.) appears. A copy of the file has been saved.)
-
Click Format > Styles and Formatting (The "Styles and Formatting" window appears.) Click the Paragraphs Styles, , icon. (The "Paragraph Styles" menu appears. The list of words in the
window is the names of Paragraph Styles that are available for use with
paragraphs. To see a list of "all the Paragraph Styles" available,
in the dialog box at the bottom of the "Styles and Formatting"
window, click the and scroll until you can select All Styles.)
-
Right-click Heading 1. (A small menu appears,.) Click Modify. (The "Paragraph Style: Heading 1" window appears. )
-
Click on the Alignment tab. In the Options section, click Center. (A dot appears before the word “Center”.) Click the Text Flow tab. (The "Text Flow" tab is used so that when the "Master
Document" is printed, each chapter starts on a new page.) In the “Breaks”
section, click Insert. (Click to place a check mark before "Insert". The word “Page” appears in the "Type" dialog box and the word “Before” appears in the "Position" dialog box.)
-
Click on the Font tab. If it is not already selected/highlighted, click Arial ("Font) > Bold ( “Typeface”) > 16 pt. (“Size”). (The “Size” may be specified in percent or in points.
To change from percent to points, delete the number in the upper “Size”
box and type a number followed by the letters, pt., such as 25pt. To change
from points to percent, delete the “Size” number and type a
number followed by the percent symbol such as 25%.)
-
Click OK. (The "Paragraph Style: Heading 1" window closes.)
-
Type the words, Chapter 1 – Meat.
-
In the Styles and Formatting window, double-click Heading 1. (The words "Chapter 1 - Meat" move to the center of the line.)
-
Press Enter. Type the words, Information is entered starting here. (The "Text body" paragraph style is activated. The cursor moves down to the next paragraph.)
-
Press Enter. Type the words, This is the second paragraph.
-
In the Styles and Formatting window, right-click Heading 2. (The small menu, , appears.)
-
Click Modify. (The "Paragraph Style: Heading 2" window appears. )
-
Click on the Alignment tab. In the Options section, click on the word, Left. Click the Indent & Spacing tab. In the Indent section, in the Before text dialog box, type .50.
- Click the Text Flow tab. In the Breaks section, click Insert. Click on the Font tab. If it is not already selected/highlighted, click Arial ("Font) > Bold ( “Typeface”) > 14 pt. (“Size”) . Click OK.(The "Paragraph Style: Heading 2" window closes.)
Add Sub-Chapter 1 With Paragraphs And Sub-Chapter 2 With Paragraphs
-
Press Enter. Type the words, Sub-Chapter 1: Beef
-
Double-click Heading 2. (The words, “Sub-Chapter 1: Beef”, move to the next page (page 2) and are indented ½ inch and are in
bold.)
-
Press Enter. Type the words, Information is entered starting here.
-
Press Enter. Type the words, Sub-Chapter 2: Pork
-
In the Styles and Formatting window, double-click Heading 2. (“Sub-Chapter 2: Pork” appears on the next (third) page.)
- Press Enter. Type the words, Information is entered starting here.
Select Index Entries For "Chapter 1" And Save "Chapter 1"
-
Scroll up to the first page, click on the word, Meat. (The cursor is flashing on the word, "Meat".)
-
Click Insert > Indexes and tables > Entry. (The "Insert Index Entry" window appears. The word “Meat” is already entered in the “Entry” dialog box.)
-
In the Type pull-down menu, select Alphabetical Index, if it is not already selected.. Click Main Entry > Apply to all similar texts. (A check mark appears before the words, “Main Entry” and "Apply to all similar texts".)
-
Click the Insert button. (There is no indication that anything happened.)
-
On the second page, click Meat. In the Insert Index Entry window, click in the Entry dialog box. (The word, "Meat", replaces the word, "Introduction"
in the entry box.)
-
Click the Insert button. (There is no indication that anything happened.)
-
On the third page, click Beef. (The word “Beef” replaces the word “Meat” in
the “Entry” dialog box.) Click in the Entry box. Click on the words, Main Entry, to remove the check mark. (The check mark is no longer by "Main Entry".)
-
In the 1st key box, type the word Meat. Click the Insert button. (The word, "Meat", appears in the "1st key"
dialog box.)
-
On the fourth page, click Pork. Click in the Entry dialog box. (The word, "Pork" replaces the word, "Beef" in
the "Entry" dialog box.)
-
Click Insert. (There is no indication that anything happened.)
-
Click Close. (The "Insert Index Entry" window closes.)
-
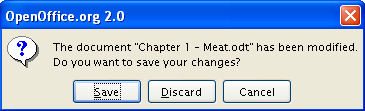
Click File > Close. (You will see the message below.)
-
Click Save. (The file named “Chapter 1” is saved for later use in this
tutorial.)
Create The “Chapter 2” Document
Modify/Apply The “Heading 1” And Modify The"Heading 2"
Paragraph Styles
-
Click File > New > Text Document. ( appears.)
-
Click File > Save As. In the Save in: pull-down menu box, click My Documents if it is not already selected. In the Save as type: pull-down menu box, click OpenDocument Text (.odt) if it is not already selected.
-
In the File name: box, type Chapter 2 then click the Save button. ( appears. A copy of the file has been saved.) appears. A copy of the file has been saved.)
-
Type Chapter 2.
-
Click Format > Styles and Formatting. (The "Styles and Formatting" window appears.) Click the Paragraphs Styles icon. (The "Paragraph Styles" menu appears. The list of words in the
window is the names of Paragraph Styles that are available for use with
paragraphs. To see a list of "all the Paragraph Styles" available,
in the dialog box at the bottom of the "Styles and Formatting"
window, click the and scroll until you can select All Styles.)
-
Right-click on the word, Heading 1. (A small menu appears,.) Click Modify. (The "Paragraph Style: Heading 1" window appears. )
-
Click on the Alignment tab. In the Options section, click on the word Center. Click the Text Flow tab. In the Breaks section, click Insert . Click on the Font tab. If it is not already selected/highlighted, click Arial ("Font) > Bold ( “Typeface”) > 16 pt. (“Size”). (The “Size” may be specified in percent or in points.
To change from percent to points, delete the number in the upper “Size”
box and type a number followed by the letters, pt., such as 25pt. To change
from points to percent, delete the “Size” number and type a
number followed by the percent symbol such as 25%.) Click OK. (The "Paragraph Style: Heading 1" window closes.)
-
Type the words, Chapter 2 – Vegetables.
-
Double-click on Heading 1. (The words, “Chapter 2 - Vegetables”, move to the center of the line.)
-
Press Enter. Type the words, Information is entered starting here. (The cursor moves down to the next paragraph.)
-
Press Enter. Type the words, This is the second paragraph.
-
In the Styles and Formatting window, right-click Heading 2. (The small menu, , appears.)
-
Click Modify. (The "Paragraph Style: Heading 2" window appears.) Click on the Alignment tab. In the Options section, click on the word Left. Click the Indent & Spacing tab. In the Indent section, in the “Before text” dialog box, type .50.
- Click the Text Flow tab. In the Breaks section, click Insert . Click on the Font tab. If it is not already selected/highlighted, click Arial ("Font) > Bold ( “Typeface”) > 14 pt. (“Size”). Click OK. (The "Paragraph Style: Heading 2" window closes.)
Add Sub-Chapters 1 and 2 With Paragraphs For Chapter 2
-
Press Enter. Type the words, Sub-Chapter 1: Carrots.
-
Double-click Heading 2. (The Paragraph Style named “Heading 2” is activated. The words “Sub-Chapter 1: Carrots” move to the next page (page 2). The words are indented, Bold, Arial font,
and 14 font size.)
-
Press Enter. Type the words, Information is entered starting here.
-
Press Enter. Type the words, Sub-Chapter 2: Corn
-
Double-click Heading 2. (“Sub-Chapter 2: Corn” appears on the next (third) page.)
-
Press Enter. Type the words, Information is entered starting here.
- Press Enter until you reach the fourth page. Type On the cob. (“On the cob” appears on the fourth page.)
Select Index Entries For 'Chapter 2" And Save "Chapter 2"
-
On the first page, click Vegetables. (The cursor is flashing on the word, Vegetables.)
-
Click Insert > Indexes and tables > Entry. (The "Insert Index Entry" window appears. The word “Vegetables” is already entered in the “Entry” dialog box.)
-
In the Index pull-down menu, select Alphabetical Index, if it is not already selected. Click Main Entry > Apply to all similar texts. (A check mark appears before the words “Main Entry”and the words, "Apply to all similar texts".)
-
Click the Insert button. (There is no indication that anything happened.)
-
On the second page, click Carrots.
-
In the Insert Index Entry window, click in the Entry dialog box. (The word “Carrots” replaces the word “Vegetables”
in the “Entry” dialog box.)
-
In the 1st key box, type the word, Vegetables. Click on the words, Main Entry to remove the check mark. (The check mark is no longer before the words,
"Main Entry".)
-
Click the Insert button. (There is no indication that anything happened.)
-
On the third page, click Corn. Click in the Entry dialog box. (The word “Corn” replaces the word “Carrots” in
the “Entry” dialog box.)
-
Click the Insert button. (There is no indication that anything happened.)
-
On the fourth page, highlight On the cob. Click in the Entry dialog box. (The words “On the cob” appear in the Entry dialog box.) In the 2nd key box, type the word, Corn.
-
Click Insert . (There is no indication that anything happened.)
-
Click Close. (The "Insert Index Entry" window closes.)
-
Click File > Close. (You will see the message below.)

-
Click Save. (The file named “Chapter 2” is saved for later use in this
tutorial.)
Create Additional Chapters
Additional chapters can be created but they are not added in this tutorial.
To create additional chapters, repeat the procedure used to create Chapter
2.
Create The “My Cookbook” Master Document
Create A New Master Document File
-
Click File > New > Master Document. ( appears. (Note the difference in the icons for "New > Text Document" and "New > Master Document" . A small “Navigator” window also appears. The Navigator window
can be moved out of the way by dragging. ) appears. (Note the difference in the icons for "New > Text Document" and "New > Master Document" . A small “Navigator” window also appears. The Navigator window
can be moved out of the way by dragging. )

-
In the “Navigator” window, long-click the Insert,  icon. (Long-click means to click on the icon AND keep holding down the mouse button
until the pull-down menu appears.) icon. (Long-click means to click on the icon AND keep holding down the mouse button
until the pull-down menu appears.)
-
Drag the cursor over the word File. (File becomes highlighted.) Release the mouse button. (The Insert window appears.)
-
Click My Documents if it is not already selected. Click Introduction > Insert. (The "Introduction" file is added to the list.)
- Repeat the procedure in Steps 2, 3, and 4 above to add Chapter 1 and Chapter 2. (The "Chapter 1" and the "Chapter 2" files are added
to the list above the word “text” and appear on the screen.)
Adding A Footer With Page Numbers
-
Click Insert > Footer > Default. (The Footer opens at the bottom of the page.)
-
Type My Cookbook and press the space bar about 10 times. Type Page and press the space bar once. Click Insert > Fields > Page Number. (Each page in “My Cookbook” will have a footer with the words,
“My Cookbook” and “Page (Page Number)
- If you want the page count in your footer, press the space bar again and type of. Press the space bar. Click Insert > Fields > Page Count. (Each page in “My Cookbook” will have a footer with the words,
“My Cookbook” and “Page (Page Number) of (Page Count)”.)
Creating A Table Of Contents
-
In the “Navigator” window, click Chapter 1.odt.
-
Long-click the Insert icon. Drag the cursor over the word Index. Release the mouse button. (The Insert Index/Table window appears.)
-
In the Type box, choose Table of Contents. Click Protected against manual changes to remove the check mark. (The check mark is no longer by "Protected
against manual changes". ) Click OK. (The "Table Of Contents" appears on the screen at the beginning
of the “book”.)
-
Click Index Styles in the dialog box at the bottom of the Styles and Formatting window. (If you have closed the "Styles and Formatting" window,
click "Format > Styles and Formatting". Click the and scroll until you can select "Index Styles".)
-
In the Styles and Formatting window, right-click on Contents Heading. (The small menu, , appears.)
- Click Modify. (The "Paragraph Style: Contents Heading" window appears.) Click the Alignment tab. In the Options section, click on the word Center. Click OK . (A dot appears before the word “Center” indicating that “Center” has been selected. The words “Table of Contents” move to the center of the line.)
Inserting The Index
-
In the Navigator window, click text under the last chapter in the book which, in this tutorial, is Chapter 2.odt.
-
Long-click the Insert icon. Drag the cursor on the word, Index, then release the mouse button. (The “Insert Index/Table” window
appears.) In the Type pull-down menu box, choose Alphabetical Index. Click Protected against manual changes to remove the check mark. (The check mark is no longer by "Protected
against manual changes". ) Click OK. (The "Alphabetical Index" appears at the end of the "book".
)
-
Click Index Styles in the dialog box at the bottom of the Styles and Formatting window. (If you have closed the "Styles and Formatting" window,
click "Format > Styles and Formatting". Click the and scroll until you can select "Index Styles".)
-
In the Styles and Formatting window, right-click on Index Heading. (The small menu, , appears.)
-
Click Modify. (The "Paragraph Style: Index Heading” window appears.) Click the Alignment tab. In the Options section, click on the word Center. (A dot appears before the word “Center” indicating that “Center” has been selected.) Click OK. (The words “Alphabetical Index” move to the center of the line.)
-
Close the Styles and Formatting window. (Click on the X in the box in the upper right corner.)
Use Navigator To Change The Sequence Of Chapters And Sub-Chapters And To
Make Changes In Entries Selected In The Documents
Change The Sequence of Sub-Chapters
-
Click File > Open. In the look in: menu dialog box, click My Documents if it is not already selected. Under My Documents, click Chapter 1: Meat > Open.
-
Click the Navigator,  , icon. (The "Navigator" window appears.) , icon. (The "Navigator" window appears.)
-
In the Navigator window, click the Content View,  , icon (If the Content View icon is not present, click the Toggle, , icon (If the Content View icon is not present, click the Toggle,  , icon in the top left corner in the Navigator window). , icon in the top left corner in the Navigator window).
-
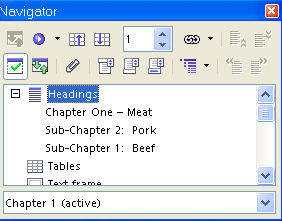
Under Headings, click Sub-Chapter 1: Beef (The words, "Sub-Chapter 1: Beef" , are highlighted. If there is a + in front of "Headings", click on "Headings" to see the names of the chapter and sub-chapters which appear in the same
order as they are in the "Chapter 1: Meat" file.
-
Click the Move Down,  , icon. (“Sub-Chapter 1: Beef” now appears in the list below
“Sub – Chapter 2: Pork”.) , icon. (“Sub-Chapter 1: Beef” now appears in the list below
“Sub – Chapter 2: Pork”.)
-
Click File > Close. (You will get the message below:)
-
Click Save. (The changes made in "Chapter 1 - Meat" are saved.)
-
In the Navigator window in My Cookbook, click the Update,  , icon and drag the cursor over All and release the mouse button. (You will see the message below. "Update all links?" ) , icon and drag the cursor over All and release the mouse button. (You will see the message below. "Update all links?" )

-
Click Yes. ("Sub-Chapter 2: Pork" appears above "Sub-Chapter 1: Meat"
in the "Table Of Contents".)
- To put Sub-Chapter 1: Beef before the Sub-Chapter: Pork. Repeat the above procedure.
Change The Sequence of Chapters
-
In the Navigator window in My Cookbook, click Chapter 1 - Meat. (The words, "Chapter 1 - Meat" , are highlighted.) Click the Demote Chapter,  , icon in the Navigator window. ( “Chapter 1 - Meat” now appears in the list below “Chapter
2 - Vegetables”.) , icon in the Navigator window. ( “Chapter 1 - Meat” now appears in the list below “Chapter
2 - Vegetables”.)
-
In the Navigator window in My Cookbook, click the Update, , icon and drag the cursor over All and release the mouse button. (You will see the message below.)
-
Click Yes. ("Chapter 2 - Vegetables" appears above "Chapter 1 - Meat"
in the "Table Of Contents".)
- To put Chapter 1 - Meat before the Chapter 2 - Vegetables. Repeat the above procedure.
Make Changes In Entries Selected In Documents
-
Open the document that the error in the entry was made. (Click "File
> Open > My Documents". Click on the name of the document.)
-
Right-click before the entry you need to change. Click Index/Entry. Make changes.
-
Click File > Close. (You will see the message below:) 
-
Click Save. (The changes made are saved.)
-
In the Navigator window in My Cookbook, long-click the Update icon and drag the cursor down to the word, All, and release. (You will see the message below.)
-
Click Yes.
Print, Save, Make Changes After Saving "My Cookbook"
-
To print, click File > Print > OK.
-
To save, click File > Close.
-
To make changes In My Cookbook after saving It Open My Cookbook. (Click "File > Open > My Documents > My Cookbook".)
-
In the Navigator window in My Cookbook, double-click on the file in which you want to make the changes. When
the document opens, make the desired changes, Click Close . (You will see the following message.)
-
Click Save. (The document is saved with the changes made.)
-
In the Navigator window in My Cookbook, long-click the Update icon and drag the cursor down to the word, All, and release. (You will see the message below.)
-
Click Yes.
-
Click Close. (You will see the message below.)
-
Click Save. (The "My Cookbook" Master Document has been saved with the changes.)
NOTE
Tutorials are improved by input from users. We solicit your constructive
criticism.
Click here to E-mail your suggestions and comments
Edited by Sue Barron
Master Document For My Cookbook 11/21/06
Last modified: 2008-04-30 01:42 UTC
   
|

