|
How To Write A Tutorial
Purpose
The purpose of this tutorial is to provide the step-by-step procedure used
to write a tutorial for our website www.tutorialsforopenoffice.org A template named Author's Template will be used so that some of the steps needed are already done.
Download And Save This Tutorial And The "Author's Template"
-
Go to our website www.tutorialsforopenoffice.org Under Our Tutorial Offerings, click on the underlined Writer. (The WRITER (word processing ) Tutorials page appears)
-
Scroll down to Chapter 9 – WRITTING AND USING TUTORIALS. At Lesson 2 – Part 1 click on the underlined blue OO
-
Select Open with. Click OK.
-
Click File > Save As. In the Save in: pull-down menu box, click My Documents if it is not already selected. In the Save as type: pull-down menu box, click OpenDocument Text (.odt) if it is not already selected.
-
In the File name: dialog box, type the name of the tutorial.
-
Click Save. (The tutorial is saved.)
-
To download and save the Author's Template, repeat the above except at step 2. click on the blue underlined here.
Open and Print This Tutorial
Keep a printed copy of this tutorial available as you do your tutorial.
-
In OpenOffice, click File > Open. (The "Open" window appears.) .
-
Go to your My Documents folder and double-click on the file, "How To Write A Tutorial". (The "How To Write A Tutorial" appears on your screen.)
-
Click File > Print > OK.
Open The "Author's Template"
-
Click File > Open. (The "Open" window appears.)
-
Go to My Documents folder and double-click the file, Author's Template. (The "Author's Template" appears on your screen.)
Title Of Your Tutorial
The 1st line of the text document on your screen is formated for the title of
your tutorial. Delete the X. On that same line, type the name of your tutorial. Press Enter twice.
Purpose Of Your Tutorial
Write the purpose of your tutorial in a paragraph or two.
Note that most tutorials are a step-by-step procedure to do a specific
thing in OpenOffice.
-
By pressing “Enter” above, your cursor is at the beginning
of a new paragraph and the Paragraph Style: text body is in effect.
-
In the Apply Style pull-down menu box, select Heading 1. (The cursor moves to the center of the line.)
-
Type the Purpose of your tutorial.
-
Write the steps to do something in in a numbered step-by-step format. (You have created a great tutorial.)
Paragraph Headings
A Paragraph Heading is used at the top of one or more paragraphs. Title Of Your Tutorial and Purpose Of Your Tutorial, above, are examples of Paragraph Headings.
Four different Headings are used in our tutorials.
-
The Paragraph Style: Heading 1 is centered and is used for major sections.
-
The Paragraph Style: Heading 2 is Aligned Left and indented ½ inch. It is used as a sub-section under the Paragraph Style: Heading 1.
-
The Paragraph Style: Heading 3 is Aligned Left and indented 1 inch. It is used for a sub-section under the Paragraph Style: Heading 2.
-
The Paragraph Style: Heading 4 is Aligned Left and indented 1 ½ inch. It is used for a sub-section under the Paragraph Style: Heading 3.
The Way The Headings Will Appear In Your Tutorial
Paragraph Style: Heading 1
(one or more paragraphs will go here)
Paragraph Style: Heading 2
(one or more paragraphs will go here)
Paragraph Style: Heading 3
(one or more paragraphs will go here)
Paragraph Style: Heading 4
(one or more paragraphs will go here)
Modify the Footer
-
Click in the Footer. Delete the name that is in the Footer then add the name of your tutorial.
-
Delete the Date. (In the "Footer", click anywhere on the "Date" then
press the "Delete" key.)
-
Click Insert > Fields > Date to add today's date.
Create A Table Of Contents And Add Hyperlinks
Create A Table Of Contents
A "Table of Contents" is done after you complete your document.
The headings and sub-headings in your document become the entries in the
"Table of Contents".
-
Click after the last word in the title of the document. (The flashing cursor
appears after the last letter in the title of your tutorial.)
-
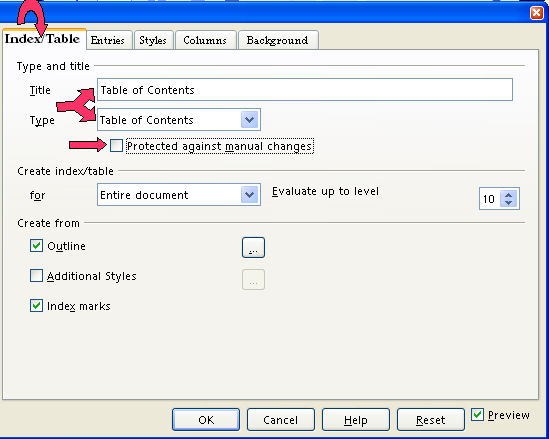
Click Insert > Indexes & Tables > Indexes & Tables. (The “Insert Index/Table” window appears.)
-
Select the Index/Table tab. In the Type dialog box, select Table Of Contents. Uncheck Protected against manual changes.
Add Hyperlinks To The Table Of Contents
-
To make the Hyperlinks, click the Entries tab of the window, click to the left of the E and click Hyperlink. Click after the E and click Hyperlink again. Click All.
-
Click OK. (In the "Table of Contents", all the headings are in "blue
and underlined" and are now "Hyperlinks". When you click
on them, you will be taken to that section.)
Send The Tutorial
Please send the tutorial to
NOTE
Tutorials are improved by input from users. We solicit your constructive
criticism.
Click here to E-mail your suggestions and comments
Edited by Sue Barron
How To Write A Tutorial 11/10/07
Last modified: 2008-04-30 01:42 UTC
   
|

