|
Gallery
What This Tutorial Does
Writer has a Gallery that contains many graphics. We will learn to use the Gallery and work with the pictures.
Using The Gallery
Open The Gallery
-
Click File > New > Text Document.
-
Click on the Gallery icon  or click Tools > Gallery. (You may have changed your icons to another display; if so, click on the
icons to find the "Gallery" icon. The “Gallery” window appears with a lot of colored graphics (pictures). On the left side of the Gallery
window are the words, “Backgrounds, Bullets, etc. These words are
the names of different "Themes". In the "Gallery', the folders
are called "Themes". or click Tools > Gallery. (You may have changed your icons to another display; if so, click on the
icons to find the "Gallery" icon. The “Gallery” window appears with a lot of colored graphics (pictures). On the left side of the Gallery
window are the words, “Backgrounds, Bullets, etc. These words are
the names of different "Themes". In the "Gallery', the folders
are called "Themes".
- Click on the Bullets Theme. The graphics that are in the Bullets Theme (Bullets folder), appear
on the screen.
Add/Rename/Delete/Themes In The Gallery and Use Undo
-
To add a Theme in Gallery, click Gallery > New Theme....> Properties > General (The “Properties of New Theme" window appears.)
-
Replace the words, New Theme, with a name of your choice. (If you do not select a name for the Theme,
each time you click on the "New Theme" button, a new theme will
appear with the names, "New Theme, New Theme 1", etc.)
-
To rename a Theme in Gallery, Select the Theme you want to rename. Right-click on the Theme. Click Properties > Rename. (A window appears with the current name of the Theme highlighted.) Replace the Theme name with a name of your choice. (The Theme in Gallery is renamed. )
-
To delete a Theme in Gallery, select the Theme you want to delete. (A window appears.) Right-click on the Theme. Click Delete. (The Theme is deleted. The Theme is no longer on the page.)
- Click Edit > Undo: (item's name appears here) (The Theme reverts to its former name or reappears in the Gallery.)
Add A New Graphic To The Gallery
Graphics may be downloaded from the Internet, scanned, created with a graphics
program, or be photos taken with a digital camera and uploaded to your
computer. To insert a graphic image from a file, the file must be stored
in a folder on your computer.
-
Click Gallery > My Theme. (For this tutorial, we are going to use "My Theme". "My Theme"
appears on the screen and it has no entries. You can add the picture to any Theme in Gallery.)
-
Right-click on My Theme. Click Properties > File tab > Find Files button. (The “Properties of My Theme” window appears.) Select the folder in which to start the search and the file types to limit the
search.
- Select the picture(s) you want to add to Gallery. Click Add. (To select more than one file, hold the Control Key down while you click
on each file. To add all the files, click "Add All". The picture(s) appears in "My Theme".)
Find The Path To The Gallery File
If you want to add more graphics to the Gallery, there are several clipart
libraries designed for OpenOffice on the Internet. One source is the KAMI's
Clipart Collection which can be found
http://www.oooforum.org/forum/viewtopic.phtml?t=23393&start=0
You will need to know the path to the Gallery File in order to place the
Clipart libraries in the Gallery so you can use it.
-
Click Tools > Options. If there is a – in front of the words, “OpenOffice.org”,
click on the words, "OpenOffice.org. (A list of choices appear under the word “OpenOffice.org”.)
-
Click on the word “Paths”. The Options – OpenOffice.org
- Paths window appears) The path to the Gallery is on the screen.
Working With Graphics In Your Document
Copy A Graphic (A Picture) From The Gallery
-
Click Format > New > Text Document. Type the word, Learning. Highlight it. (To highlight the word, "Learning", click and hold on the first
letter while moving the pointer over the word and when you reach the end
of the word, "Learning", release the mouse button.) Click the Bold icon and the Centered icon. (Place your cursor on the icons on the "Formatting toolbar" to
find the "Bold" icon and the "Centered" icon.) Press Enter. (The word, "Learning", moves to the center and is in bold.)
-
Click on the Homepage Theme The graphics that are in the Homepage Theme appear in the Gallery.
-
Scroll down until you see  (To scroll down, click on the (To scroll down, click on the  a number of times until the picture appears.) a number of times until the picture appears.)
-
Drag the graphic, , below the word, Learning. (Dragging is done by clicking on the graphic and moving the mouse without letting go of the mouse button until the graphic is where you want to
place it. The picture is moved below the word, "Learning".)
- Click on the Gallery icon. (The "Gallery" window closes.)
Resize The Picture
Using The Mouse
- Click on the picture. ( An anchor will appear. Eight points (green squares), called handles, will appear along the sides of the picture. )
- Place your pointer on any of the points. Click and drag the mouse to modify
the picture. (A double-headed arrow ,.
 , will appear. The size of the picture changes but is distorted.) , will appear. The size of the picture changes but is distorted.)
-
To keep the proportions of the graphic, press and hold the Shift key. Click and drag a handle of the picture. Release the mouse button to complete the resize. (The size of the picture
changes and is not distorted.)
- When you have changed the picture to the desired size, click anywhere on the page except on the picture. (The picture will be the desired size.)
Using The “Picture" Window
-
Right-click anywhere on the picture. (A menu appears.)
-
Click Picture. (The “Picture” window appears.)
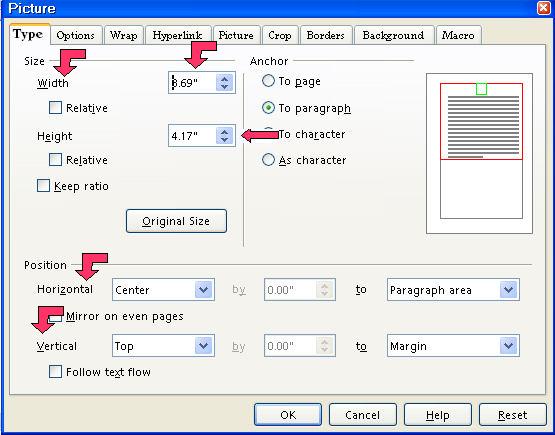
- Click on the Type tab. In the Size section, set the Width to 1.0”. (The cursor is flashing just before the numbers in the “Width” box. Highlight and delete (using the Del key) the numbers and
type "1.0".) Set the Height to 2.0. (In the “Height” box, click just before the number. Highlight and delete (using
the Del key) the numbers . Type 2.0. The picture changes size.)
Relocate The Picture
In The Document Itself
Using The Mouse
- Click on the graphic/picture. The mouse pointer turns into a four-way arrow like this
 . (An anchor will appear. Eight points (green squares), called handles, will
appear along the sides of the picture.) . (An anchor will appear. Eight points (green squares), called handles, will
appear along the sides of the picture.)
- Long-click on the and drag the picture to the desired place on your page. (Dragging is done by clicking on the graphic and moving the mouse without letting go of the mouse button until the graphic is where you want to
place it. The picture changes location.)
Using The "Picture" Window
-
Right click in the picture, click Picture. (The "Picture" window appears.) Click the Type tab. Under the Position section, click From left in the dialog box to the right of Horizontal. In the dialog box to the right of by, change the setting to 1.0”. (In the “by” box, click just before the number. Type 1.0, then press Del to delete the original number.)
-
In the dialog box to the right of Vertical, click From top. In the dialog box to the right of by, change the setting to 1.0” (In the “by” box, click just before the number. Type 1.0, then press Del to delete the original number.)
- Click the OK button. (The picture changes location.)
The Same Picture In Another Location In Your Document Or In Another Document
-
Right-click on the picture. Click Copy (The picture is saved onto the clipboard.)
- Place the pointer and click where you want to put a copy of the same picture
in your current document or in another document. Click Paste. (The same picture is in the document or in another document.)
Insert Graphic As A Background
-
In the document, click on the page OR on the paragraph that will have the background. For this tutorial, we will click on the page.
-
Click the Gallery icon > Backgrounds. In the Backgrounds Theme, right- click on the graphic of your choice. (For this tutorial , we will use the "Backgrounds"
Theme folder but you may use any Gallery Theme folder. You may use a picture
as a background.)
-
Click Insert > Background > Page (OR Paragraph). The background you selected becomes the background for the page.
- To close Gallery, click on the Gallery icon.
Anchor The Graphic/Picture - A Brief Introduction
You can anchor graphics to a page, paragraph, or character, or as a character.
You can place graphics in a frame and anchor the frame to a page, paragraph,
or character. Anchored items remain even if you insert or delete text.
Further information about the anchoring is contained in the Anchoring Help section.
To Page
- Anchors the selected item to the current page. Format > Anchor > To Page
- The anchored item remains on the current page even if you insert or delete
text.
- The anchor icon is displayed at the top left corner of the page.
To Paragraph
-
Anchors the selected item to the current paragraph. Format > Anchor > To Paragraph.
- The anchor icon is displayed at the left page margin at the beginning of
the paragraph.
To Character
-
Anchors the selected item to a character.
- This command is only available for graphic object. Format > Anchor > To Character
As A Character
-
Anchors the selected item as a character in the current text. This is usually
the one you would use to insert a picture between text.
-
If the height of the selected item is greater than the current font size,
the height of the line containing the item is increased.
- Format > Anchor > As Character
To Frame
-
Anchors the selected item to the surrounding frame.
- Format > Anchor > To Frame
Change Anchor
-
Allows you to switch between anchoring options.
-
The Change Anchor icon is only visible when an object such as a graphic, control field or
frame is selected.
NOTE
Tutorials are improved by input from users. We solicit your constructive
criticism.
Click here to E-mail your suggestions and comments
Edited by Sue Barron
Gallery 10/30/06
Last modified: 2008-04-30 01:42 UTC
    
|

