|
Frames
You are already using frames if you have inserted a picture or other object
in a document. The picture or object automatically appears in a frame.,
Within Frames you can have text, tables, images (pictures and logos), and
multiple columns.
-
A Frame can position something in a particular place on a page such as
when you are producing a multi-column newsletter or bulletin.
-
Linked Frames can allow text to continue somewhere else in the document
so the contents flow between the Linked Frames as you edit the text. Linked
Frames can be on different pages.
-
A Frame can wrap text around an object such as a photograph.
Results Of This Tutorial
It may be helpful to have a printout of the results of doing this tutorials
as you do the tutorial. To download the results of doing this tutorial,
go to our website www.tutorialsforopenoffice.org Under Our Tutorial Offerings, click on Writer. On the Writer (word processing) Tutorials page, scroll down to Chapter 6. At Lesson 2, click on the blue underlined word here. Select Open with then click OK. Click File > Save As. In the Save in: pull-down menu box, select My Documents. Click the Save button.
Open A New Text Document
Click File > New > Text Document. (the  document appears. document appears.
Create A Frame And Add Text
-
You can select the location to insert the frame by using any combination
of the following: Enter key, Space bar, Arrow keys, Page Up key, Page Down key
-
For this tutorial, press the Enter Key twice then press the Space bar three times.
-
Click Insert > Frame. (The "Frame" window appears.) Click the OK button. (An empty Frame appears with an anchor,  , The Frame , The Frame  , has eight green squares called handles--four of which are located in
the corners and one in the middle of each side.) , has eight green squares called handles--four of which are located in
the corners and one in the middle of each side.)
-
Right click any where within the Frame. (A menu appears) Click Anchor. Select To Page. (The frame moves up to the top of the page and is centered.)
-
Anchoring the Frame to To page keeps the Frame positioned in relation to the page margins. It does not
move when you delete or add text. You can also anchor the Frame To paragraph and the Frame will move with the paragraph or To character and the Frame is associated with a character or As character and the Frame is placed in the document like any other character and affects
the height of the text line and the line break. Further selections can
be made under Position: Horizontal or Vertical.
-
Click anywhere on the page other than in the frame. (The handles are no longer in view.) Click inside the frame and type To insert text inside the frame, click inside the frame and type. (The text appears inside the frame.)
-
When you are done, click anywhere on the page except in the frame.
Insert A Frame Around Text
-
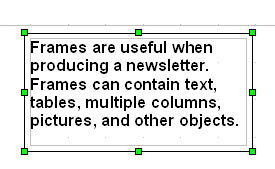
Type Frames are useful when producing a newsletter. Frames can contain text,
tables, multiple columns, pictures, and other objects. Highlight the text you just typed.
-
Click Insert > Frame. (The "Frame" window appears.) In the Frame dialog box under Size, Width, click Automatic. Under Size, Height, click AutoSize > OK. (A frame appears around “Frames are useful when producing a newsletter. Frames can contain text,
tables, multiple columns, pictures, and other objects.” with handles (green squares).
-
Click inside the frame and type As you type, you will see the frame adjust to fit the text. (The Frame will adjust its height and width as you type.)
-
When you are done, click anywhere on the page except in the frame.
Resize Or Change The Location Of The Frame Using The Mouse
-
Using the frame created above, place your pointer on any of the handles.
(If the handles are not visible, click the edge of the frame to select
it and the eight handles will reappear.) Click (The pointer becomes  .) and drag a handle of the frame. Release the mouse button to complete the resize. (The frame can be moved or resized any time by clicking on the edge to reveal the
handles.) .) and drag a handle of the frame. Release the mouse button to complete the resize. (The frame can be moved or resized any time by clicking on the edge to reveal the
handles.)
-
To move the frame to another location on the document, click on the edge
of the frame to reveal the handles. Place your pointer inside the frame.
(The pointer becomes  ). Click and drag the mouse to desired location ). Click and drag the mouse to desired location
-
When you have changed the Frame to the desired size and location, click anywhere on the page except on
the frame.
Resize Or Move The Frame Using The Frame Window
Using the mouse is faster but not as accurate as using the Frame window.
You might choose the mouse for gross layout and the Frame window for fine-tuning.
-
Place your pointer where you want the the frame. Click Insert > Frame. (The "Frame" window appears.) Click OK. (The frame appears. . The handles will disappear if you click outside the frame.)
-
Open the Frame window by right-clicking inside the frame. (Make sure that the handles are visible. A menu opens.) Click Frame. (The "Frame" window appears.)
-
Under Size, Width, click on the  and select 1.99. Under Height, click Relative. and select 1.99. Under Height, click Relative.
-
Under Position: Horizontal, click Center. (You can also select “Left”, “Right”, or “From
left”. To use “From left”, you will need to indicate
the number of inches from the left.)
-
Under Position: Vertical, click Bottom > OK. (You can also select “Center” or “Top” or “From
top. To use “From top”, you will need to indicate the number
of inches from the top.)
-
The frame changes as shown below.

-
When you are done, click anywhere on the page.
Create A Customized Frame
-
Place your pointer and click where you want the frame. Click Insert > Frame. (The "Frame" window appears.)
-
Under Size, Width, click in the dialog box to the right, highlight and delete the numbers. Type
4.09". (Another method to insert the numbers for the Width is to click on the  and select 4.09”.) Under Height, click AutoSize > OK. (A frame appears that is approximately 4 inches wide and 1/2 inch high.) and select 4.09”.) Under Height, click AutoSize > OK. (A frame appears that is approximately 4 inches wide and 1/2 inch high.)
-
Click OK. (Note that the “Frame” toolbar replaces the “Formatting”
toolbar in the fourth row from the top of your screen when you click OK.)

-
When you are done, click anywhere on the page.
Linking Frames
You can link frames to each other even when they are on different pages
of a document. The contents will automatically flow from one to the next. This is useful when designing
newsletters where articles may need to be continued on a different page.
-
Using the frame created above, click inside the frame and type This is the first frame.
-
Click anywhere on the page except in the frame. Press Enter until you reach another page.
-
Place your pointer and click on this page where you want the second frame.
Click Insert > Frame. (The “Frame” window opens.) Under Size, Width, click Automatic. Under Height, click AutoSize > OK. (The "Frame" toolbar replaces the "Formatting" toolbar.
“Frame” is in the dialog box. A second frame appears.)
-
Scroll to the first frame and click on its border (The green handles will
appear.) to select it as the frame to which you are going to link the second
frame. Click the Link Frames  icon on the Frame Toolbar. (You may have to click on the icon on the Frame Toolbar. (You may have to click on the  on the Frame Toolbar to see the "Link Frames" icon. The pointer changes to on the Frame Toolbar to see the "Link Frames" icon. The pointer changes to  . .
-
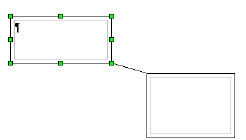
Scroll to the next page to the second frame. (Place the pointer in the
Scroll Bar (on the right of your screen) and move the pointer.) Click in
the second frame (which must be empty). (You will see a line displayed that connects the linked frames. To make the
line disappear, click anywhere on the page. If you click on the edge of
the frame, the line will reappear.)
-
Type Each frame may have one frame linked to it. For example, in a document, there are three frames. The second frame is
linked to the first frame. The third frame may be linked to the second
frame but cannot be linked to the first frame. Only the third frame can
adapt its height to the content." To see an example of this step,
download the file, Example For "Linking Frames". After the frames are linked, the height of the first frame (the frame to
which the second frame is linked) is fixed unless you resize it.
-
Note: You can resize either frame by clicking on the edge to make the handles
reappear or use the frame dialog box.
-
If you resize the frames, your typing may move from one frame to the other
frame.
-
Only the last frame of a chain can adapt its height to the content.
-
You cannot link from a frame to more than one other frame however, you
can link a third frame to the second frame, a fourth frame to the third
frame, etc. Frames may be linked throughout the document by following this
procedure. To see how the frames are linked, click on edges of the first
frame, the second frame, etc.
-
To unlink the frames, click on the edge of the frame to reveal the handles. (The
“Frame Toolbar” appears.) On the Frame Toolbar, click  . (You may have to click on the on the “Frame Toolbar” to see the "Unlink Frames" icon.) The Frame Toolbar is below.) . (You may have to click on the on the “Frame Toolbar” to see the "Unlink Frames" icon.) The Frame Toolbar is below.)
-
To unlink a series of frames, click on the frame to which the frame is
linked, (For example, click the first frame to unlink the second frame
or click the second frame to unlink the third frame.)
Delete A Frame
-
Click on the border of the frame to select it. (The green handles will
appear.)
- Press the delete (Del) key on the keyboard to remove the frame and its
contents.
Delete A Frame Without Deleting Text
-
Click inside Frame, select/highlight all text.
-
Click the Cut  icon (text is copied to clipboard) icon (text is copied to clipboard)
-
Delete the frame by pressing the Delete key.
-
Click the Paste  icon to paste the text onto document. (Text appears on document.) icon to paste the text onto document. (Text appears on document.)
Three Things To Remember
In working with frames:
-
Click on the edge of the frame to make the handles appear.
-
Click outside the frame anywhere on the page. The handles will disappear.
-
Click on the inside of the frame to type.
Note
Tutorials are improved by input from users. We solicit your constructive
criticism.
Click here to E-mail your suggestions and comments
Edited by Sue Barron
Frames 08/11/07
Last modified: 2008-04-30 01:42 UTC
   
|

