|
Different Page Styles In a Document
Tutorial donated by Clinton Chee
This tutorial explains how to have different "Page Styles" in
the same document. We will create a "Page Style" with the "Portrait
Orientation" and a "Page Style" with the "Landscape
Orientation". The document we create will have four pages with "Page
1" having the "Portrait Orientation", "Page 2"
having the "Landscape Orientation", "Page 3" having
the "Portrait Orientation", and "Page 4" having the
"Landscape" Orientation.
Open a new text document
-
IF on the desktop, click  > All Programs > OpenOffice.org 2.2 > OpenOffice.org Writer. > All Programs > OpenOffice.org 2.2 > OpenOffice.org Writer.
-
IF you are in OpenOffice.org Writer, click File > New > Text Document.
-
In either case, the text document  appears on our screen. appears on our screen.
Create a"Page Style" named "Portrait" and a "Page
Style" named "Landscape"
-
Click Format > Styles and Formatting, (The "Styles and Formatting" window appears.) Click the Page Styles,  , icon. , icon.
-
Click the New Style From Selection,  , icon > New Style from Selection. (The "Create Style" window appears.) , icon > New Style from Selection. (The "Create Style" window appears.)
-
In the dialog box under Style Name, type Portrait. Click OK. (The word 'Portrait” is added to the list of "Page Styles”)
-
Again, click the New Style From Selection, , icon > New Style from Selection.
-
In the dialog box under Style Name, type Landscape. Click OK. (The word 'Landscape” is added to the list of "Page Styles”)
- In the “Styles and Formatting” window, right-click Landscape. (A small menu appears with the choices, "New, Modify, Delete".) Click Modify (The "Page Style: Landscape" window appears.) Click the Page tab. At “Orientation”, click Landscape. (A dot appears before "Landscape") > OK. (The "Page Style: Landscape" window closes.)
Apply the "Page Styles", "Portrait" and "Landscape"
-
Notice that “Page 1/1” and “Default” appear at
the bottom of the screen. “Page 1/1” means you are in a document
that has 1 page. “Default” is the name of the Page Style that
is controlling this page.
-
Type This is the Page Style named Default.
-
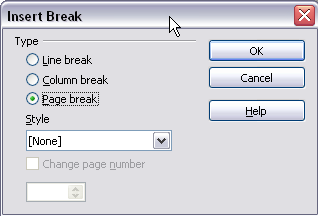
Click Insert > Manual Break. (The "Insert Break" window appears.) Under Type, verify that there is a dot in the circle before Page break.
-
In the menu box under Style, click the  to select Landscape. Click OK. (“Page 2/2” and “Landscape” appear at the bottom
of the screen.) to select Landscape. Click OK. (“Page 2/2” and “Landscape” appear at the bottom
of the screen.)
-
Click Insert > Manual Break. In the menu box under Style, click the to select Portrait. Click OK. (“Page 3/3” and “Portrait” appear at the bottom
of the screen.)
-
Click Insert > Manual Break. In the menu box under Style, click the to select Landscape. Click OK. (“Page 4/4” and “Landscape” appear at the bottom
of the screen.)
-
The document will now have pages 1 and 3 controlled by the Page Style named
“Portrait” and pages 2 and 4 controlled by the Page Style named
"Landscape".
Save as a template
-
Click File > Save As. (The “Save As” window appears)
-
In the “Save As type:” pull-down menu, select OpenDocument Text Template (.ott). In the “File name:” box, type a name of your choice. The “Save in:” box has “My Documents” selected.
(The template can be open and the Page Styles will be the same as you created
in this tutorial.
Close the file
-
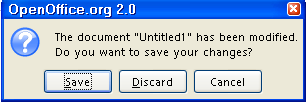
Click File > Close. (A message appears)
-
Click Discard.
-
The document is no longer on the screen.
NOTE
Tutorials are improved by input from users. We solicit your constructive
criticism.
Click here to E-mail your suggestions and comments
Edited by Sue Barron
Different Page Styles In A Document 02/07/08
Last modified: 2008-04-30 01:42 UTC
   
|

