|
Create A Newsletter
We are going to create a newsletter with a masthead, Issue, Subheading, Headline Text or Story Heading, Heading Text, lines, columns, and pictures.
Results Of This Tutorial
It is very helpful to have a printout of the Newsletter before actually
doing the tutorial. Click here to download the Newsletter.
Open A New Text Document
-
IF on the desktop, click  > All Programs > OpenOffice.org 2.2 > OpenOffice.org Writer. > All Programs > OpenOffice.org 2.2 > OpenOffice.org Writer.
-
IF you are in OpenOffice.org Writer, click File > New > Text Document.
-
In either case, the text document  appears on our screen. appears on our screen.
Modify The Paragraph Style: Text Body
-
Click Format > Styles and Formatting. (The “Styles and Formatting" window appears.)
-
Click the Paragraph Styles  icon. icon.
-
Right-click Text body. Click Modify. (The “Paragraph Style: Text body” window appears.) Click the Alignment tab. In the Options section, click Left. (A dot appears before the word “Left”.)
-
Click the Font tab. If it is not already selected/highlighted, click Arial (Font) > Regular (Typeface) > 12 pt. (Size) > OK. (The “Size” may be specified in percent or in points. To change
from percent to points, delete the number in the upper “Size”
box and type a number followed by the letters, pt., such as 25pt. To change
from points to percent, delete the “Size” number and type a
number followed by the percent symbol such as 25%.).
Save "Newsletter"
-
Click File > Save As. In the Save in: pull-down menu box, click My Documents if it is not already selected. In the Save as type: pull-down menu box, click OpenDocument Text (.odt) if it is not already selected.
-
In the File name: dialog box, type Newsletter.
-
Click Save. (The file, "Newsletter" is saved and can be used in other tutorials.
The file is still on the screen.)
Create A Simple Masthead
A masthead is also called a flag or nameplate.
-
flag which is a statement printed in all issues of a newspaper, magazine, or
the like, usually on the editorial page, giving the publication's name,
the names of the owner and staff, etc.
- nameplate which is a line of type on the front page of a newspaper or the cover
of a periodical giving the name of the publication.
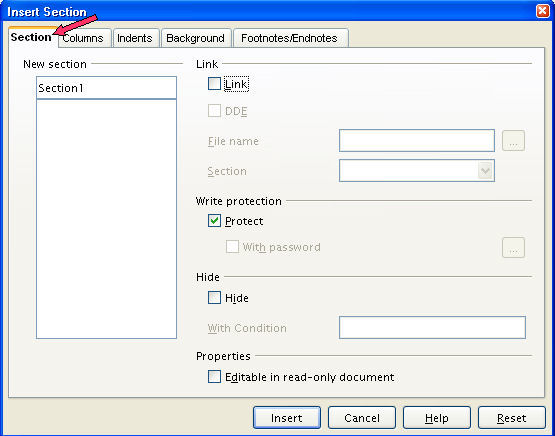
Insert Section For Newsletter Title
-
Click Insert > Section. (The "Insert Section" window appears.) In the dialog box under
New Section, click inside the Section 1 dialog box and name it, Newsletter Title (or you can leave Section 1 as the name of the section.)
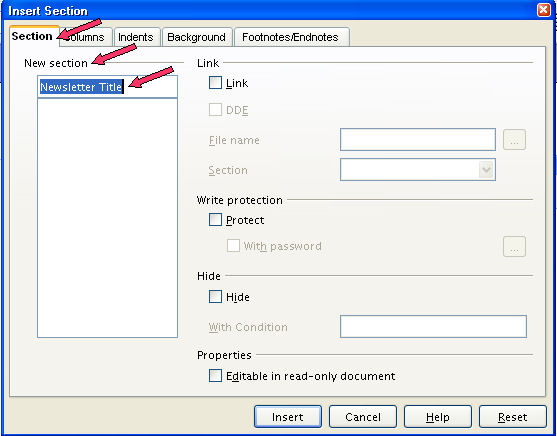
-
Click the Background tab. Under As, click Color (if it is not already selected.) Under Background color, select Blue 8.
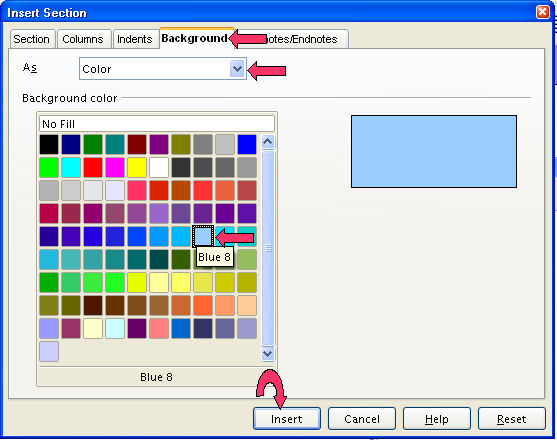
- Click Insert. (The blue section will appear on your document.)
Create, Modify and Apply The Paragraph Style: Newsletter Title
-
Place your pointer inside the blue section on your document and type Newsletter. (Or whatever you would like to call your newsletter.)
-
Click Format > Styles and Formatting. (The “Styles and Formatting" window appears.)
-
Click the Paragraph Styles icon
-
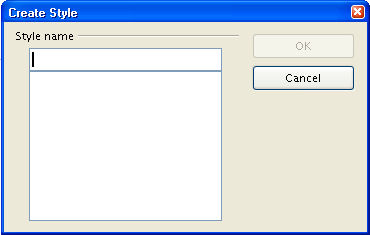
Click the New Style From Selection,  , icon. (The "Create Style" window appears.) , icon. (The "Create Style" window appears.)
-
In the Style name dialog box, type Newsletter Title. (Naming the "New section" Newsletter Title and the "Paragraph
Style: Newsletter Title", will remind you that the two go together.)
-
Click OK.
-
Right-click Newsletter Title. Click Modify. (The “Paragraph Style: Newsletter Title” window appears.) Click the Alignment tab. In the Options section, click Center. (A dot appears before the word “Center”.)
-
Click the Font tab. If it is not already selected/highlighted, click (Font Name) Verdana > (Font) > Bold (Typeface) > 40 pt. (Size) > OK. (The “Size” may be specified in percent or in points. To change
from percent to points, delete the number in the upper “Size”
box and type a number followed by the letters, pt., such as 25pt. To change
from points to percent, delete the “Size” number and type a
number followed by the percent symbol such as 25%.).
-
Click the Organizer tab. (The "Organizer" window appears.) Click on the  in the Next Style dialog box and select Text Body. Click on the in the Linked with dialog box and select -None-. in the Next Style dialog box and select Text Body. Click on the in the Linked with dialog box and select -None-.
-
Double click Newspaper Title. ("Newsletter" is centered in bold large letters.)
- Save your work frequently in case your program or computer crashes or in
case you make a mistake that you cannot back out of easily. That way you
do not lose everything. This would be a good place to save what you have
already accomplished.
Publication Information For The Masthead
Insert A Table
-
Hit the Enter button to move the insertion point to the line under the newsletter title
line.
-
Click on Insert > Table and reset the table size to one row and three columns. ( A table is used
here because tables are simple yet they allow very tight control over the
placement of text, images, objects, and other elements on the page.)
-
Click Format > Styles and Formatting > Paragraph Styles > Special Styles.
Right click on Table Contents. Click Modify. Click the Font tab. If it is not already selected/highlighted, click Arial (Font) > Bold Italics (Typeface) > 12 pt. (Size). Click OK. (The “Size” may be specified in percent or in points. To
change from percent to points, delete the number in the upper “Size”
box and type a number followed by the letters, pt., such as 25pt. To change
from points to percent, delete the “Size” number and type a
number followed by the percent symbol such as 25%.)
-
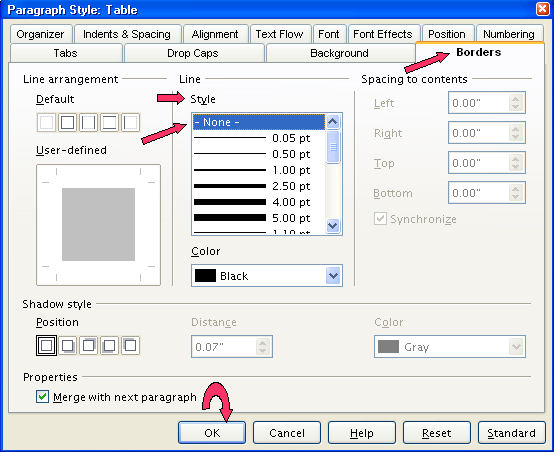
In the Styles and Formatting window, right click on the Paragraph Style: Table.
-
Click the Borders tab. Under Line > Style, click – None -. (This will get rid of the vertical cell-boundary lines in the publication
information table in the Masthead.)
Add The Publication Information For The Masthead
- Click in the left cell of the table and type Published by and your name or organization. Click the Align Left,
 , icon. (The "Published by" and "your name or organization"
is justified to the left edge of the left cell.) , icon. (The "Published by" and "your name or organization"
is justified to the left edge of the left cell.)
- In the center cell, type the (C) symbol to indicate your newsletter is copyrighted and no one can copy it
without your permission. Click the Centered,
 , icon (The copyright mark, ©, is centered in the middle cell of the
table.) , icon (The copyright mark, ©, is centered in the middle cell of the
table.)
-
In the right cell, type the publication date of your newsletter. Click
the Align Right,  , icon. (The publication date is justified to the right edge of the right
cell in the table. Using table cells for the publication-information table
allowed "Published by" to be justified to the left edge of the
table, the "publication date" to be justified to the right edge
of the table, and the "copyright mark" to be centered between
"Published by" and "publication date".) , icon. (The publication date is justified to the right edge of the right
cell in the table. Using table cells for the publication-information table
allowed "Published by" to be justified to the left edge of the
table, the "publication date" to be justified to the right edge
of the table, and the "copyright mark" to be centered between
"Published by" and "publication date".)
-
Place the mouse-pointer under the publication information table you just
created and click to place the insertion point there.
-
Hit the Enter key to move the insertion point down one more line.
Set Up A Two-Column Section for Articles
-
Insert a Section under the Masthead by clicking on Insert > Section > Section tab (The Insert Section window appears.)
-
Click the Columns tab. ( The "Columns" window appears.)
-
Under Settings > Columns, click the to change the number to 2. Remove the check mark by Evenly distribute contents to all columns by clicking on the box.

-
Click Insert. (You will see the section with two columns below.)

Create, Modify and Apply The Paragraph Style: Headline
The "headline" is the title or caption of an article, usually
set in large type. It is a good typesetting practice to use different typefaces
for the "headline" and "article text". We modified
the "Paragraph Style: Text body (article text)" and changed the
font name to "Arial' in the section, "Change The View Setting
And Modify The Paragraph Style: Text Body". For the Paragraph Style:
Headline, we will use the font name, "Courier New".
-
Place your pointer inside the left section and type, Learning To Create A Newsletter.
-
Click Format > Styles and Formatting. (The “Styles and Formatting" window appears.)
-
Click the Paragraph Styles icon
-
Click the New Style From Selection, , icon. (The "Create Style" window appears.)
-
In the Style name dialog box, type Headline.
-
Click OK.
-
Right-click Headline. Click Modify. (The “Paragraph Style: Headline” window appears.) Click the Alignment tab. In the Options section, click Center. (A dot appears before the word “Center”.)
-
Click the Font tab. If it is not already selected/highlighted, click Courier New (Font) > Bold (Typeface) > 26 pt. (Size) > OK. (The “Size” may be specified in percent or in points. To change
from percent to points, delete the number in the upper “Size”
box and type a number followed by the letters, pt., such as 25pt. To change
from points to percent, delete the “Size” number and type a
number followed by the percent symbol such as 25%.)
-
Click the Organizer tab. (The "Organizer" window appears.) Click on the in the Next Style dialog box and select Text Body. Click on the in the Linked with dialog box and select -None-.
-
Save your work frequently in case your program or computer crashes or in
case you make a mistake that you cannot back out of easily. That way you
do not lose everything. This would be a good place to save what you have
already accomplished.
Create, Modify and Apply The Paragraph Style: Subheading
-
The subheading is the heading of a subdivision under the Headline.
-
Click Enter after your headline, Learning To Create A Newsletter. Type First Step is the Masthead.
-
Click Format > Styles and Formatting. (The “Styles and Formatting" window appears.)
-
Click the Paragraph Styles icon
-
Click the New Style From Selection, , icon. (The "Create Style" window appears.)
-
In the Style name dialog box, type Subheading.
-
Click OK.
-
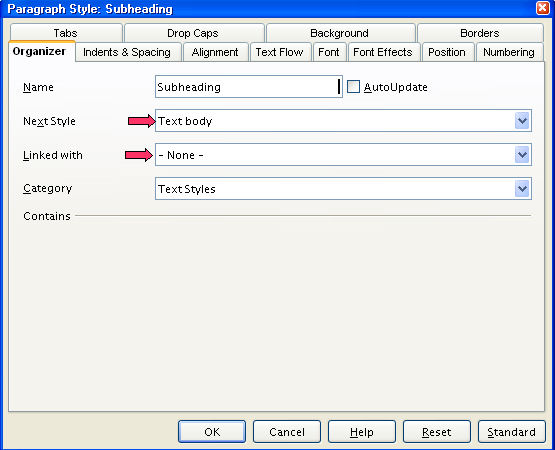
Right-click Heading. Click Modify. (The “Paragraph Style: Subheading” window appears.)
-
Click the Alignment tab. In the Options section, click Left. (A dot appears before the word “Left”.)
-
Click the Font tab. If it is not already selected/highlighted, click (Font Name) Arial > (Font) > Bold (Typeface) > 16 pt. (Size) > OK. (The “Size” may be specified in percent or in points. To change
from percent to points, delete the number in the upper “Size”
box and type a number followed by the letters, pt., such as 25pt. To change
from points to percent, delete the “Size” number and type a
number followed by the percent symbol such as 25%.).
-
Click the Organizer tab. (The Organizer window appears.) Click on the in the Next Style dialog box and select Text Body. Click on the in the Linked with dialog box and select -None-.
-
Click OK. This is another good place to save your work so far.
Enter Text Under The Subheading
For this tutorial, we will not actually enter text. Press Enter about 10 times.
Enter Text In One Column And Move The Cursor To The Other Column In Writer
If you are near the end of the column, you may press Enter repeatedly until the cursor is moved to the second column.
OR
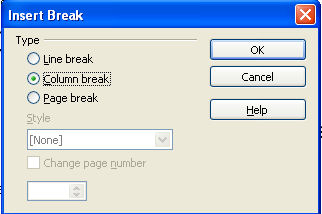
Click where you want to stop in the column. Click Insert > Manual Break > Column break.
Insert A Picture
-
Place the insertion point one line below the last line of text in the left
column. (In this tutorial, the insertion point is 10 lines under the subheading.)
-
Do one of the following.
-
Use the picture in this tutorial. Right click on the picture below (green
handles will appear). Click Copy
-
Or use a picture saved on your computer.
-
Click Insert > Graphics > From file. Navigate to the directory where you placed the picture that you want
to insert into your newsletter.
-
When you get to the correct directory, click on the Title of the file that you want to insert to place the file in the File name: window. Click on Open to insert the picture.
-
Click Paste,  . If the picture is where you wanted it, you have finished "Newsletter". . If the picture is where you wanted it, you have finished "Newsletter".
Use The Fontwork Gallery To Change The Appearance Of The "Newsletter
Title" or "Headline"
-
Click View > Toolbars > Drawing or click the Show Draw Functions,  , icon on the Standard Toolbar. (The "Drawing Toolbar"
appears) , icon on the Standard Toolbar. (The "Drawing Toolbar"
appears)
-
Click on the Fontwork Gallery,  , icon on the Drawing Toolbar. , icon on the Drawing Toolbar.

-
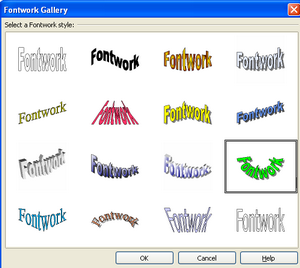
The Fontwork Select a fontwork style window appears. Choose a Font from the selection by putting your pointer on it and clicking.
-
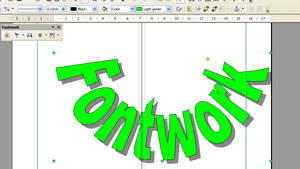
Click on the green, Fontwork, word. Click OK. (The word, "Fontwork" appears on the page in very large text.
)
Change The Word
-
You will need to change the word, Fontwork, to the word that you want to use and resize it.
-
Start by putting your pointer on the word Fontwork and double clicking. You will notice that a smaller version of the word
Fontwork appears. Type Newsletter. (You can either add to the word that is there or replace it with your
own word or words.)

-
Click anywhere on the page to accept the changes. (The word, "fontwork",
has been changed to "Newsletter.")

Change the Shape, Move and Resize the Word, Newsletter.
-
After you have your new word on the page, you may want to change the Shape. Click on the Shape,  , icon on the Fontwork Toolbar. (A menu appears with different shapes.) Click Wave. , icon on the Fontwork Toolbar. (A menu appears with different shapes.) Click Wave.
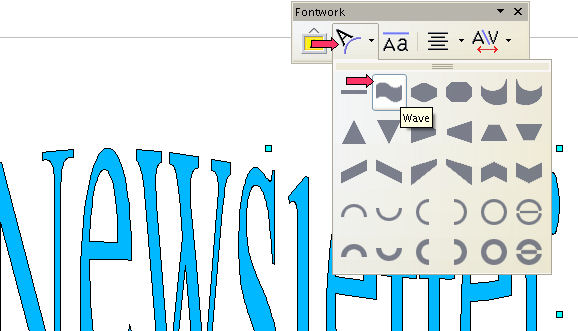
-
We have changed the shape of the word, Newsletter, to the Wave shape.

-
You can move the word to any part of the page by clicking and holding the
left mouse button and dragging and dropping it anywhere you like.
- You can resize the Fontwork by using the resizing handles located at the edges of the box in the same
way as you do with pictures or Clip Art in other programs.
Fontwork Alignment
-
Click on the  to the right of the Fontwork Alignment, to the right of the Fontwork Alignment,  , icon on the Fontwork Toolbar. (A menu appears.) , icon on the Fontwork Toolbar. (A menu appears.)
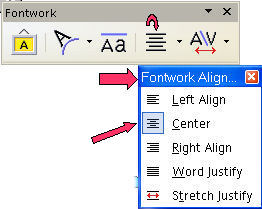
-
You have five alignment choices. Click Center.
View Column Borders And Other Layout Organization Borders
To see the column borders and other layout organization borders of your
newsletter, click on View and then check Text boundaries and Field Shadings by clicking on them.
Close And Save "Newsletter"
-
Click File > Save. (The file, "Newsletter", is still on the screen.)
-
Close. (The file, "Newsletter", is no longer on the screen.)
NOTE
Tutorials are improved by input from users. We solicit your constructive
criticism.
Click here to E-mail your suggestions and comments
Donated by Sue Barron
Create A Newsletter 08/24/07
Last modified: 2008.04.25 20:33 UTC
   
|

