|
CHANGE A DOCUMENT (RED-LINING OR TRACKING CHANGES)
Red-Lining or Tracking Changes
”Red-lining” or “tracking changes” are the names used
for the ability that allows you to make changes while retaining the original
material. For example, when you delete a word or words, OpenOffice draws
a colored line through the word(s) but doesn't remove them. When you send
the file to another person, he or she will be able to see what you have
proposed as changes and what was there originally.
“Red-lining has the ability to accept or reject all of the proposed changes
or one change at a time.
This tutorial allows you to make proposed changes, adding a comment, and accepting or rejecting the changes.
Open A New Text File
-
IF on the desktop, click  > All Programs > OpenOffice.org 2.3 > OpenOffice.org Writer. > All Programs > OpenOffice.org 2.3 > OpenOffice.org Writer.
-
IF you are in Writer or Calc, click File > New > Text Document.
-
In either case, the text document appears on our screen.
Select A Color
Changes are usually marked in red. Red was set as the default when you downloaded
OpenOffice. When more than one person is proposing changes, it can be helpful
if different people use different colors. You can change your color by
clicking "Tools > Options > OpenOffice.org Writer > Changes". Click on the  and scroll until you find the color you want. and scroll until you find the color you want.
We will use red in this tutorial.
Enter Text
Text will be entered so we have something that can be Red-lined.
Type the words, John is flying to New York to visit his parents, Joe and Mary Falcon, and
his grandparents, Paul and Cindy Falcon.
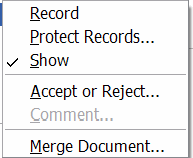
How To Start Red-lining
-
Click Edit > Changes. (A menu appears)
-
Changes will be recorded when there is a check mark before the word Record.
-
IF there is a check mark before the word Record, move your mouse so that the pointer is off of the word Changes.
(The menu will go away) IF there is not a check mark before the word Record, click on the word Record. (The menu will go away. A check mark has been placed before the word Record)
-
You have the choice of allowing proposed changes to be seen, or not seen,
in your document. To be seen a check mark must be before the word Show.
-
IF there is a check mark before the word Show, move your mouse so that the pointer is off of the word Changes. (The
menu will go away) IF there is not a check mark before the word Show, click on the word Show. (The menu will go away. A check mark has been placed before the word Show)
Start Red Lining
Use the above section and place a check mark before Record and Show.
Delete Text
-
Delete the words “and his grandparents, Paul and Cindy Falcon.
-
Place the Mouse pointer just before the word and. Hold and keep holding down the shift key and press the down arrow key. (The words to be deleted are selected)
-
Press the Delete key. The words, "and his grandparents, Paul and Cindy Falcon", appear
in red and have a line through them.)

Add Text
-
Place the cursor after Mary Falcon, then insert a spac and add a period. Type the words, who live near New York. Press the space bar. (The words, " who live near New York",
appear in red and are underlined.)
Make A Comment
Extended tips has to be activated.
-
Click Tools > Options > OpenOffice.org > General.
-
Under Help, there has to be check marks before the words Tips and before the words Extended tips. IF a check mark is missing, click on the word(s) without the check mark.
-
When done, click on the OK button..
-
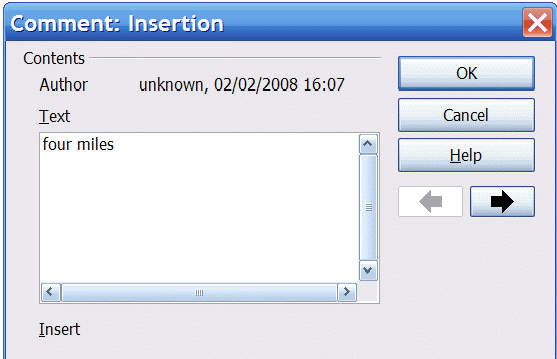
Click anywhere on the red underlined words who live in New York.
-
Click Edit > Changes > Comment. (The “Comment: Insertion” window appears.)
-
In the Text box, type the words four miles.
-
Click OK
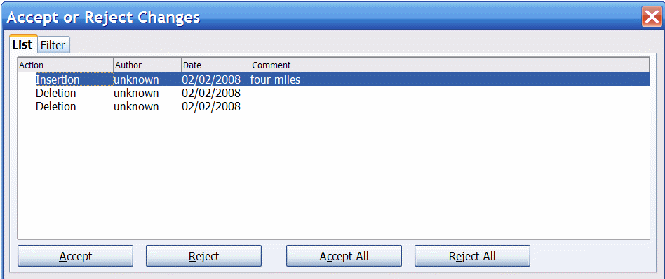
Accept or Reject Changes
-
Click Edit > Changes > Accept or Reject. (The “Accept or Reject Changes” window opens. Both the window
and the document can be seen.)
-
There presently is a bug in the 2.3 version of OpenOffice. At first you
will not be able to see the Accept, Reject, Accept All and Reject All buttons at the bottom of the Accept or Reject Changes window.
-
To see the four buttons, move the pointer of your mouse on the edge of
the Accept or Reject Changes window. The pointer changes to an arrow pointing in two directions.

-
Press and keeping holding down the left button on your mouse then move
the mouse slightly to the right. (The four buttons appear at the bottom
of the window,.
-
If needed, drag the Accept or Reject Changes window out of the way. (To drag the window, put the cursor on the blue
line that has "Accept or Reject Changes.." Press and hold down the left button on the mouse and move the mouse in the direction you want
to move the window. Release the mouse button when the window is where you
want it.)
NOTE
Tutorials are improved by input from users. We solicit your constructive
criticism.
Click here to E-mail your suggestions and comments
Edited by Sue Barron
Change A Document Red Lining or Tracking Changes 02/03/08
Last modified: 2008.04.25 20:33 UTC
  
|

